Higher-order functions in Python allows you to manipulate functions for increasing the flexibility and re-usability of your code. You can create higher-order functions using nested scopes or callable objects.
Additionally, the functools module provides utilities for working with higher-order functions, making it easier to create decorators and other function-manipulating constructs. This tutorial will explore the concept of higher-order functions in Python and demonstrate how to create them.
What is a Higher-Order Function?
A higher-order function is a function that either, takes one or more functions as arguments or returns a function as its result. Below you can observe the some of the properties of the higher-order function in Python −
A function can be stored in a variable.
A function can be passed as a parameter to another function.
A high order functions can be stored in the form of lists, hash tables, etc.
Function can be returned from a function.
To create higher-order function in Python you can use nested scopes or callable objects. Below we will discuss about them briefly.
Creating Higher Order Function with Nested Scopes
One way to defining a higher-order function in Python is by using nested scopes. This involves defining a function within another function and returns the inner function.
Example
Let’s observe following example for creating a higher order function in Python. In this example, the multiplier function takes one argument, a, and returns another function multiply, which calculates the value a * b
defmultiplier(a):# Nested function with second number   defmultiply(b):# Multiplication of two numbers  return a * b
   return multiply

# Assigning nested multiply function to a variable
multiply_second_number = multiplier(5)# Using variable as high order function
Result = multiply_second_number(10)# Printing result  print("Multiplication of Two numbers is: ", Result)
Output
On executing the above program, you will get the following results −
Multiplication of Two numbers is: 50
Creating Higher-Order Functions with Callable Objects
Another approach to create higher-order functions is by using callable objects. This involves defining a class with a __call__ method.
Example
Here is the another approach to creating higher-order functions is using callable objects.
classMultiplier:def__init__(self, factor):
      self.factor = factor

   def__call__(self, x):return self.factor * x

# Create an instance of the Multiplier class
multiply_second_number = Multiplier(2)# Call the  Multiplier object to computes factor * x
Result = multiply_second_number(100)# Printing result  print("Multiplication of Two numbers is: ", Result)
Output
On executing the above program, you will get the following results −
Multiplication of Two numbers is: 200
Higher-order functions with the ‘functools’ Module
The functools module provides higher-order functions that act on or return other functions. Any callable object can be treated as a function for the purposes of this module.
Working with Higher-order functions using the wraps()
In this example, my_decorator is a higher-order function that modifies the behavior of invite function using the functools.wraps() function.
import functools

defmy_decorator(f):@functools.wraps(f)defwrapper(*args,**kwargs):print("Calling", f.__name__)return f(*args,**kwargs)return wrapper

@my_decoratordefinvite(name):print(f"Welcome to, {name}!")

invite("Tutorialspoint")
Output
On executing the above program, you will get the following results −
Calling invite
Welcome to, Tutorialspoint!
Working with Higher-order functions using the partial()
The partial() function of the functools module is used to create a callable ‘partial’ object. This object itself behaves like a function. The partial() function receives another function as argument and freezes some portion of a functions arguments resulting in a new object with a simplified signature.
Example
In following example, a user defined function myfunction() is used as argument to a partial function by setting default value on one of the arguments of original function.
On executing the above program, you will get the following results −
100
Working with Higher-order functions using the reduce()
Similar to the above approach the functools module provides the reduce() function, that receives two arguments, a function and an iterable. And, it returns a single value. The argument function is applied cumulatively two arguments in the list from left to right. Result of the function in first call becomes first argument and third item in list becomes second. This is repeated till list is exhausted.
Example
import functools
defmult(x,y):return x*y

# Define a number to calculate factorial
n =4
num = functools.reduce(mult,range(1, n+1))print(f'Factorial of {n}: ',num)
Output
On executing the above program, you will get the following results −
Python custom exceptions are user-defined error classes that extend the base Exception class. Developers can define and handle specific error conditions that are unique to their application. Developers can improve their code by creating custom exceptions. This allows for more meaningful error messages and facilitates the debugging process by indicating what kind of error occurred and where it originated.
To define a unique exception we have to typically create a new class that takes its name from Python’s built-in Exception class or one of its subclasses. A corresponding except block can be used to raise this custom class and catch it.
Developers can control the flow of the program when specific errors occur and take appropriate actions such as logging the error, retrying operations or gracefully shutting down the application. Custom exceptions can carry additional context or data about the error by overriding the __init__ method and storing extra information as instance attributes.
Using custom exceptions improves the clarity of error handling in complex programs. It helps to distinguish between different types of errors that may require different handling strategies. For example when a file parsing library might define exceptions like FileFormatError, MissingFieldError or InvalidFieldError to handle various issues that can arise during file processing. This level of granularity allows the client code to catch and address specific issues more effectively by improving the robustness and user experience of the software. Python’s custom exceptions are a great tool for handling errors and writing better with more expressive code.
Why to Use Custom Exceptions?
Custom exceptions in Python offer several advantages which enhances the functionality, readability and maintainability of our code. Here are the key reasons for using custom exceptions −
Specificity: Custom exceptions allow us to represent specific error conditions that are unique to our application.
Clarity: They make the code more understandable by clearly describing the nature of the errors.
Granularity: Custom exceptions allow for more precise error handling.
Consistency: They help to maintain a consistent error-handling strategy across the codebase.
Creating Custom Exceptions
Creating custom exceptions in Python involves defining new exception classes that extend from Python’s built-in Exception class or any of its subclasses. This allows developers to create specialized error types that cater to specific scenarios within their applications. Here’s how we can create and use custom exceptions effectively −
Define the Custom Exception Class
We can start creating the custom exceptions by defining a new class that inherits from Exception or another exception class such as RuntimeError, ValueError, etc. depending on the nature of the error.
Following is the example of defining the custom exception class. In this example CustomError is a custom exception class that inherits from Exception. The __init__ method initializes the exception with an optional error message −
To raise the custom exception we can use the raise statement followed by an instance of our custom exception class. Optionally we can pass a message to provide context about the error.
In this function process_data() the CustomError exception is raised when the data parameter is empty by indicating a specific error condition.
defprocess_data(data):ifnot data:raise CustomError("Empty data provided")# Processing logic here
Handle the Custom Exception
To handle the custom exception we have to use a try-except block. Catch the custom exception class in the except block and handle the error as needed.
Here in the below code if process_data([]) raises a CustomError then the except block catches it and we can print the error message (e.message) or perform other error-handling tasks.
Following is the basic example of custom exception handling in Python. In this example we define a custom exception by subclassing the built-in Exception class and use a try-except block to handle the custom exception −
# Define a custom exceptionclassCustomError(Exception):def__init__(self, message):
      self.message = message
      super().__init__(self.message)# Function that raises the custom exceptiondefcheck_value(value):if value <0:raise CustomError("Value cannot be negative!")else:returnf"Value is {value}"# Using the function with exception handlingtry:
   result = check_value(-5)print(result)except CustomError as e:print(f"Caught an exception: {e.message}")
Output
On executing the above code we will get the following output −
An Abstract Base Class (ABC) in Python is a class that cannot be instantiated directly and is intended to be subclassed. ABCs serve as blueprints for other classes by providing a common interface that all subclasses must implement.
They are a fundamental part of object-oriented programming in Python which enables the developers to define and enforce a consistent API for a group of related classes.
Purpose of Abstract Base Classes
Heres an in-depth look at the purpose and functionality of the Abstract Base Classes of Python −
Defining a Standard Interface
Abstract Base Class (ABC) allow us to define a blueprint for other classes. This blueprint ensures that any class deriving from the Abstract Base Class (ABC) implements certain methods by providing a consistent interface.
Following is the example code of defining the standard Interface of the Abstract Base Class in Python −
from abc import ABC, abstractmethod

classShape(ABC):@abstractmethoddefarea(self):pass@abstractmethoddefperimeter(self):pass
Enforcing Implementation
When a class inherits from an Abstract Base Class (ABC) it must implement all abstract methods. If it doesn’t then Python will raise a TypeError. Here is the example of enforcing implementation of the Abstract Base Class in Python −
classRectangle(Shape):def__init__(self, width, height):
      self.width = width
      self.height = height

   defarea(self):return self.width * self.height

   defperimeter(self):return2*(self.width + self.height)# This will work
rect = Rectangle(5,10)# This will raise TypeErrorclassIncompleteShape(Shape):pass
Providing a Template for Future Development
Abstract Base Class (ABC) is useful in large projects where multiple developers might work on different parts of the codebase. They provide a clear template for developers to follow which ensure consistency and reducing errors.
Facilitating Polymorphism
Abstract Base Class (ABC) make polymorphism possible by enabling the development of code that can operate with objects from diverse classes as long as they conform to a specific interface. This capability streamlines the extension and upkeep of code.
Below is the example of Facilitating Polymorphism in Abstract Base Class of Python −
Note: To execute the above mentioned example codes, it is necessary to define the standard interface and Enforcing Implementation.
Components of Abstract Base Classes
Abstract Base Classes (ABCs) in Python consist of several key components that enable them to define and enforce interfaces for subclasses.
These components include the ABC class, the abstractmethod decorator and several others that help in creating and managing abstract base classes. Here are the key components of Abstract Base Classes −
ABC Class: This class from Python’s Abstract Base Classes (ABCs) module serves as the foundation for creating abstract base classes. Any class derived from ABC is considered an abstract base class.
‘abstractmethod’ Decorator: This decorator from the abc module is used to declare methods as abstract. These methods do not have implementations in the ABC and must be overridden in derived classes.
‘ABCMeta’ Metaclass: This is the metaclass used by ABC. It is responsible for keeping track of which methods are abstract and ensuring that instances of the abstract base class cannot be created if any abstract methods are not implemented.
Concrete Methods in ABCs: Abstract base classes can also define concrete methods that provide a default implementation. These methods can be used or overridden by subclasses.
Instantiation Restrictions: A key feature of ABCs is that they cannot be instantiated directly if they have any abstract methods. Attempting to instantiate an ABC with unimplemented abstract methods will raise a ‘TypeError’.
Subclass Verification: Abstract Base Classes (ABCs) can verify if a given class is a subclass using the issubclass function and can check instances with the isinstance function.
Example of Abstract Base Classes in Python
Following example shows how ABCs enforce method implementation, support polymorphism and provide a clear and consistent interface for related classes −
from abc import ABC, abstractmethod

classShape(ABC):@abstractmethoddefarea(self):pass@abstractmethoddefperimeter(self):passdefdescription(self):return"I am a shape."classRectangle(Shape):def__init__(self, width, height):
      self.width = width
      self.height = height

   defarea(self):return self.width * self.height

   defperimeter(self):return2*(self.width + self.height)classCircle(Shape):def__init__(self, radius):
      self.radius = radius

   defarea(self):import math
      return math.pi * self.radius **2defperimeter(self):import math
      return2* math.pi * self.radius

defprint_shape_info(shape):print(shape.description())print(f"Area: {shape.area()}")print(f"Perimeter: {shape.perimeter()}")

shapes =[Rectangle(5,10), Circle(7)]for shape in shapes:
   print_shape_info(shape)print("-"*20)classIncompleteShape(Shape):passtry:
   incomplete_shape = IncompleteShape()except TypeError as e:print(e)
Output
On executing the above code we will get the following output −
I am a shape.
Area: 50
Perimeter: 30
--------------------
I am a shape.
Area: 153.93804002589985
Perimeter: 43.982297150257104
--------------------
Can't instantiate abstract class IncompleteShape with abstract methods area, perimeter
In this chapter, you will learn about some popular Python IDEs (Integrated Development Environment), and how to use IDE for program development.
To use the scripted mode of Python, you need to save the sequence of Python instructions in a text file and save it with .py extension. You can use any text editor available on the operating system. Whenever the interpreter encounters errors, the source code needs to be edited and run again and again. To avoid this tedious method, IDE is used. An IDE is a one stop solution for typing, editing the source code, detecting the errors and executing the program.
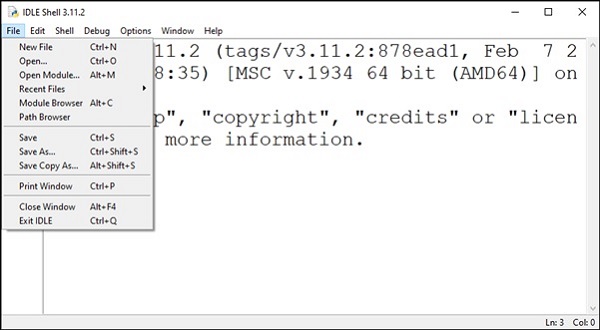
IDLE
Python’s standard library contains the IDLE module. IDLE stands for Integrated Development and Learning Environment. As the name suggests, it is useful when one is in the learning stage. It includes a Python interactive shell and a code editor, customized to the needs of Python language structure. Some of its important features include syntax highlighting, auto-completion, customizable interface etc.
To write a Python script, open a new text editor window from the File menu.
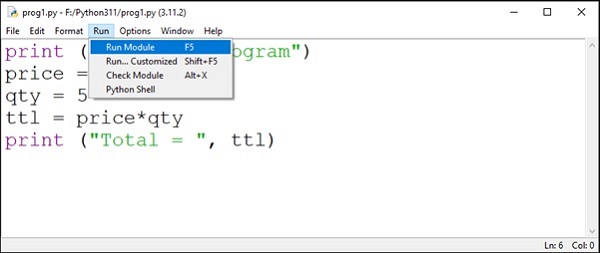
A new editor window opens in which you can enter the Python code. Save it and run it with Run menu.
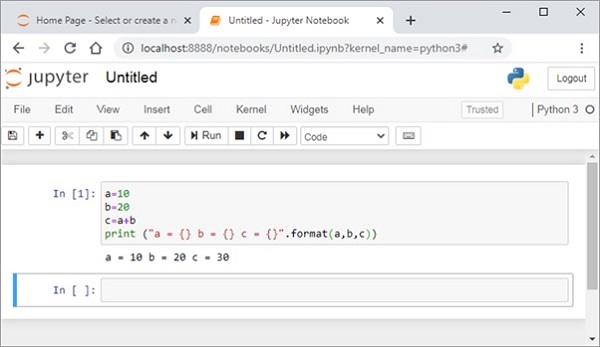
Jupyter Notebook
Initially developed as a web interface for IPython, Jupyter Notebook supports multiple languages. The name itself derives from the alphabets from the names of the supported languages − Julia, PYThon and R. Jupyter notebook is a client server application. The server is launched at the localhost, and the browser acts as its client.
Install Jupyter notebook with PIP −
pip3 install jupyter
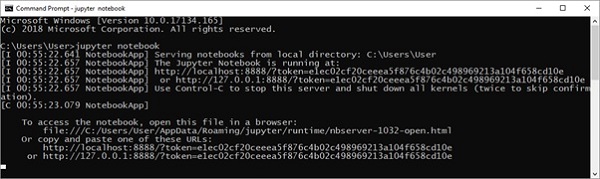
Invoke from the command line.
C:\Users\Acer>jupyter notebook
The server is launched at localhost’s 8888 port number.
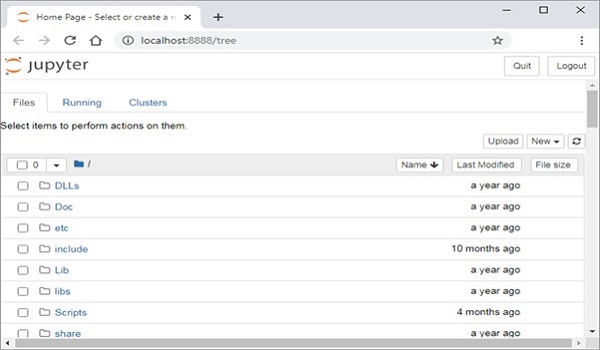
The default browser of your system opens a link http://localhost:8888/tree to display the dashboard.
Open a new Python notebook. It shows IPython style input cell. Enter Python instructions and run the cell.
Jupyter notebook is a versatile tool, used very extensively by data scientists to display inline data visualizations. The notebook can be conveniently converted and distributed in PDF, HTML or Markdown format.
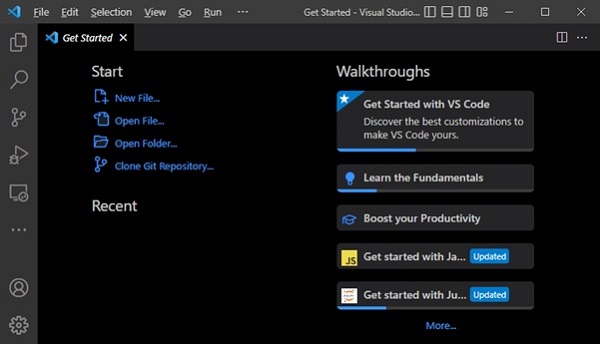
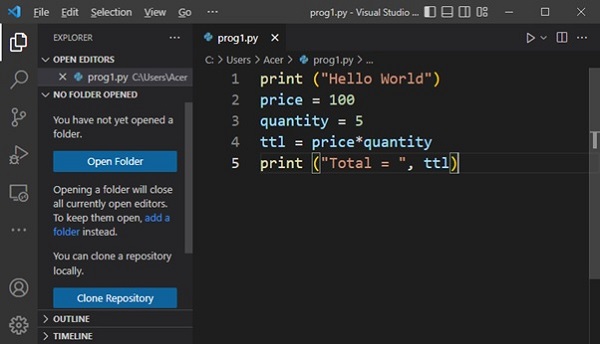
VS Code
Microsoft has developed a source code editor called VS Code (Visual Studio Code) that supports multiple languages including C++, Java, Python and others. It provides features such as syntax highlighting, autocomplete, debugger and version control.
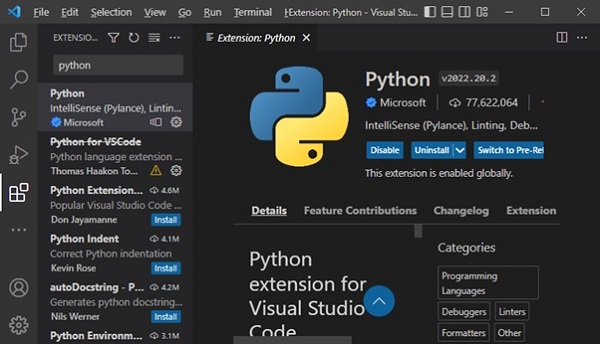
VS Code cannot be used unless respective language extension is not installed. VS Code Extensions marketplace has a number of extensions for language compilers and other utilities. Search for Python extension from the Extension tab (Ctrl+Shift+X) and install it.
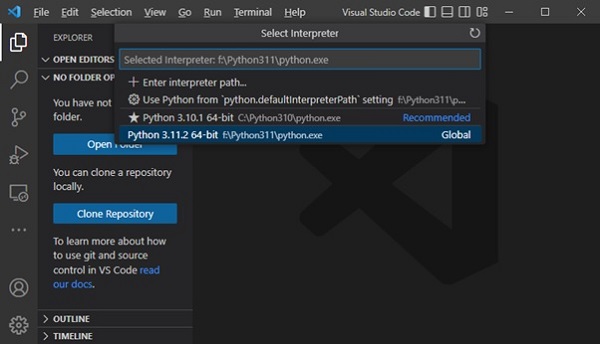
After activating Python extension, you need to set the Python interpreter. Press Ctrl+Shift+P and select Python interpreter.
Open a new text file, enter Python code and save the file.
Open a command prompt terminal and run the program.
PyCharm
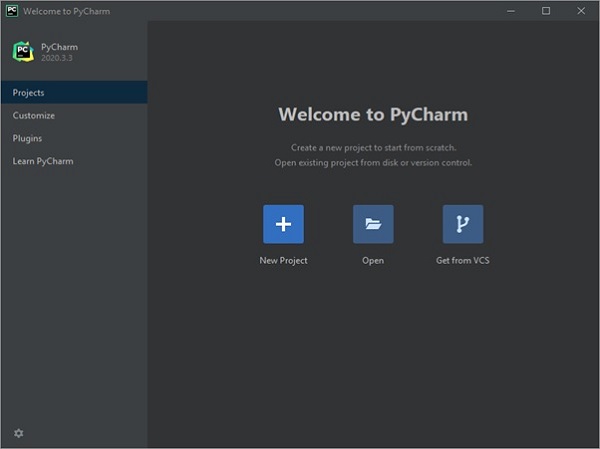
PyCharm is another popular Python IDE. It has been developed by JetBrains, a Czech software company. Its features include code analysis, a graphical debugger, integration with version control systems etc. PyCharm supports web development with Django.
Download, install the latest Version: 2022.3.2 and open PyCharm. The Welcome screen appears as below −
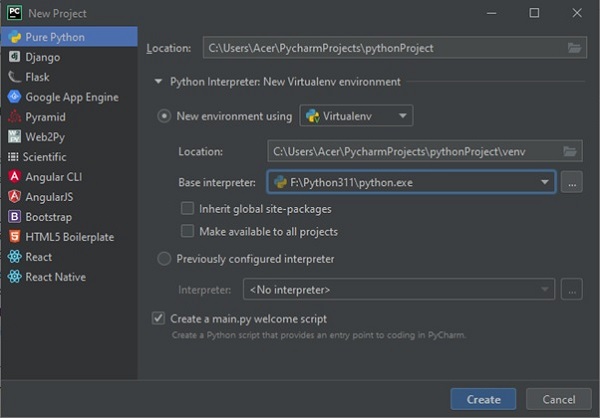
When you start a new project, PyCharm creates a virtual environment for it based on the choice of folder location and the version of Python interpreter chosen.
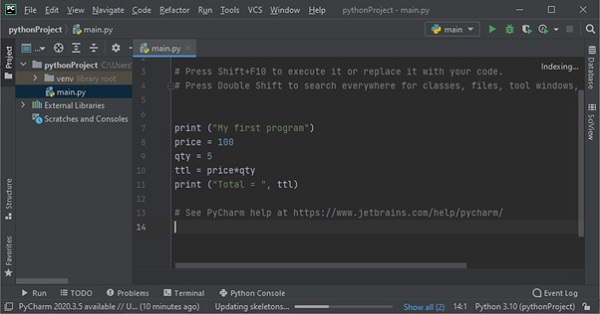
You can now add one or more Python scripts required for the project. Here we add a sample Python code in main.py file.
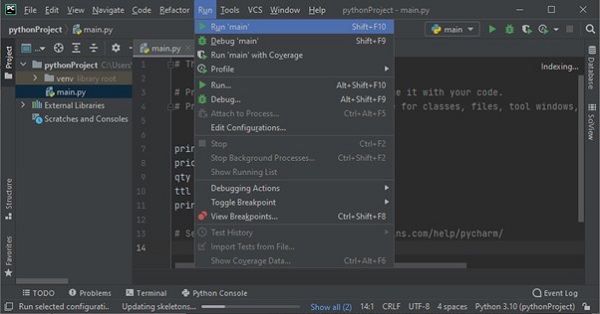
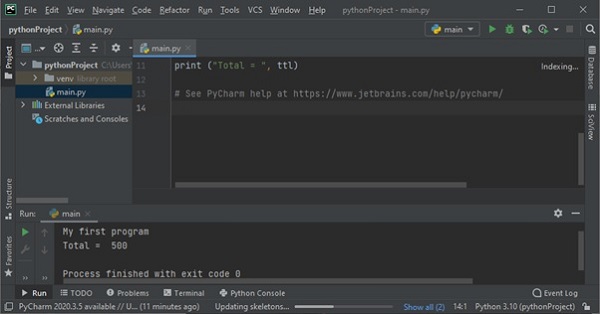
To execute the program, choose from Run menu or use Shift+F10 shortcut.
Output will be displayed in the console window as shown below −
When we start learning Python, we will begin with the core concepts-variables, data types, loops, conditionals and functions. These are the fundamental building blocks of the programming. Beyond these basics, Python offers a small useful features that makes the code easier and faster.
These extra features don’t always belong to one single category like loops or function. Instead, they are scattered throughout the language. We call them as Odds and Ends because they are like little pieces that complete the bigger picture of the Python.
Odds and Ends
In Python the Odds and Ends are the extra techniques, functions or features that don’t fall directly under loops, functions, but helps to write the programs better. They acts as the finishing touches in a program. Let’s look at the some of the common odds and ends:
Multiple Assignment − assigning values to the multiple variables in a single line.
enumerate() function − It helps to get both index and value while looping.
zip() function − It combines the two or more lists together.
List Comprehensions − It creates a new lists in short, readable way.
Importance of Odds and Ends
Below are the importance of the odds and ends in Python:
They helps to write the less code while doing the same task.
They make the programs more readable.
It allows to solve the problems more efficiently.
Examples of Odds and Ends
Let’s explore some of the examples to understand more about the Odds and Ends in Python.
Example 1
Consider the following example, where we are going to assign the values to the variables in a single line, Instead of assigning them one by one.
x, y, z =11,12,13print(x, y, z)
The output of the above program is –
11 12 13
Example 2
In the following example, we are going to use the enumerate() function to get both index and the value, Instead of managing a counter variable manually.
x =["Ram","Ravi","Rakesh"]for index, value inenumerate(x):print(index, value)
Following is the output of the above program –
0 Ram
1 Ravi
2 Rakesh
Example 3
Following is the example, where we are going to use the zip() function to combine two or more lists in the element-wise.
x =["Audi","BMW","Ciaz"]
y =[11213,1232133,1224345]for name, score inzip(x, y):print("Price of ", name,"is", score)
The output of the above program is –
Price of  Audi is 11213
Price of  BMW is 1232133
Price of  Ciaz is 1224345
The standard library comes with a number of modules that can be used both as modules and as command-line utilities.
The dis Module
The dis module is the Python disassembler. It converts byte codes to a format that is slightly more appropriate for human consumption.
You can run the disassembler from the command line. It compiles the given script and prints the disassembled byte codes to the STDOUT. You can also use dis as a module. The dis function takes a class, method, function or code object as its single argument.
Example
import dis
defsum():
   vara =10
   varb =20sum= vara + varb
   print("vara + varb = %d"%sum)# Call dis function for the function.
dis.dis(sum)
The profile module is the standard Python profiler. You can run the profiler from the command line −
Example
Let us try to profile the following program −
vara =10
varb =20sum= vara + varb
print"vara + varb = %d"%sum
Now, try running cProfile.py over this file sum.py as follow −
$cProfile.py sum.py
vara + varb =304 function calls in0.000 CPU seconds
   Ordered by: standard name
ncalls   tottime  percall  cumtime  percall filename:lineno
 10.0000.0000.0000.000<string>:1(<module>)10.0000.0000.0000.000sum.py:3(<module>)10.0000.0000.0000.000{execfile}10.0000.0000.0000.000{method ......}
The tabnanny Module
The tabnanny module checks Python source files for ambiguous indentation. If a file mixes tabs and spaces in a way that throws off indentation, no matter what tab size you’re using, the nanny complains.
Example
Let us try to profile the following program −
vara =10
varb =20sum= vara + varb
print"vara + varb = %d"%sum
If you would try a correct file with tabnanny.py, then it won’t complain as follows −
$tabnanny.py -v sum.py
'sum.py': Clean bill of health.
Any code that you write using any compiled language like C, C++, or Java can be integrated or imported into another Python script. This code is considered as an “extension.”
A Python extension module is nothing more than a normal C library. On Unix machines, these libraries usually end in .so (for shared object). On Windows machines, you typically see .dll (for dynamically linked library).
Pre-Requisites for Writing Extensions
To start writing your extension, you are going to need the Python header files.
On Unix machines, this usually requires installing a developer-specific package.
Windows users get these headers as part of the package when they use the binary Python installer.
Additionally, it is assumed that you have a good knowledge of C or C++ to write any Python Extension using C programming.
First look at a Python Extension
For your first look at a Python extension module, you need to group your code into four parts −
The header file Python.h.
The C functions you want to expose as the interface from your module..
A table mapping the names of your functions as Python developers see them as C functions inside the extension module..
An initialization function.
The Header File Python.h
You need to include Python.h header file in your C source file, which gives you the access to the internal Python API used to hook your module into the interpreter.
Make sure to include Python.h before any other headers you might need. You need to follow the includes with the functions you want to call from Python.
The C Functions
The signatures of the C implementation of your functions always takes one of the following three forms −
Each one of the preceding declarations returns a Python object. There is no such thing as a void function in Python as there is in C. If you do not want your functions to return a value, return the C equivalent of Python’s None value. The Python headers define a macro, Py_RETURN_NONE, that does this for us.
The names of your C functions can be whatever you like as they are never seen outside of the extension module. They are defined as static function.
Your C functions usually are named by combining the Python module and function names together, as shown here −
static PyObject *module_func(PyObject *self, PyObject *args){/* Do your stuff here.*/
   Py_RETURN_NONE;}
This is a Python function called func inside the module module. You will be putting pointers to your C functions into the method table for the module that usually comes next in your source code.
The Method Mapping Table
This method table is a simple array of PyMethodDef structures. That structure looks something like this −
The last part of your extension module is the initialization function. This function is called by the Python interpreter when the module is loaded. It is required that the function be named initModule, where Module is the name of the module.
The initialization function needs to be exported from the library you will be building. The Python headers define PyMODINIT_FUNC to include the appropriate incantations for that to happen for the particular environment in which we are compiling. All you have to do is use it when defining the function.
Your C initialization function generally has the following overall structure −
A simple example that makes use of all the above concepts −
#include <Python.h>
static PyObject* helloworld(PyObject* self){return Py_BuildValue("s","Hello, Python extensions!!");}
static char helloworld_docs[]="helloworld( ): Any message you want to put here!!\n";
static PyMethodDef helloworld_funcs[]={{"helloworld",(PyCFunction)helloworld,
   METH_NOARGS, helloworld_docs},{NULL}};
void inithelloworld(void){
   Py_InitModule3("helloworld", helloworld_funcs,"Extension module example!");}
Here the Py_BuildValue function is used to build a Python value. Save above code in hello.c file. We would see how to compile and install this module to be called from Python script.
Building and Installing Extensions
The distutils package makes it very easy to distribute Python modules, both pure Python and extension modules, in a standard way. Modules are distributed in the source form, built and installed via a setup script usually called setup.pyas.
For the above module, you need to prepare the following setup.py script −
from distutils.core import setup, Extension
setup(name='helloworld', version='1.0', \
   ext_modules=[Extension('helloworld',['hello.c'])])
Now, use the following command, which would perform all needed compilation and linking steps, with the right compiler and linker commands and flags, and copies the resulting dynamic library into an appropriate directory −
$ python setup.py install
On Unix-based systems, you will most likely need to run this command as root in order to have permissions to write to the site-packages directory. This usually is not a problem on Windows.
Importing Extensions
Once you install your extensions, you would be able to import and call that extension in your Python script as follows −
import helloworld
print helloworld.helloworld()
This would produce the following output −
Hello, Python extensions!!
Passing Function Parameters
As you will most likely want to define functions that accept arguments, you can use one of the other signatures for your C functions. For example, the following function, that accepts some number of parameters, would be defined like this −
static PyObject *module_func(PyObject *self, PyObject *args){/* Parse args and do something interesting here.*/
   Py_RETURN_NONE;}
The method table containing an entry for the new function would look like this −
You can use the API PyArg_ParseTuple function to extract the arguments from the one PyObject pointer passed into your C function.
The first argument to PyArg_ParseTuple is the args argument. This is the object you will be parsing. The second argument is a format string describing the arguments as you expect them to appear. Each argument is represented by one or more characters in the format string as follows.
You can probably come up with even more variations.
The PyArg_ParseTuple Function
re is the standard signature for the PyArg_ParseTuple function −
int PyArg_ParseTuple(PyObject*tuple,char*format,...)
This function returns 0 for errors, and a value not equal to 0 for success. Tuple is the PyObject* that was the C function’s second argument. Here format is a C string that describes mandatory and optional arguments.
Here is a list of format codes for the PyArg_ParseTuple function −
Code
C type
Meaning
c
char
A Python string of length 1 becomes a C char.
d
double
A Python float becomes a C double.
f
float
A Python float becomes a C float.
i
int
A Python int becomes a C int.
l
long
A Python int becomes a C long.
L
long long
A Python int becomes a C long long.
O
PyObject*
Gets non-NULL borrowed reference to Python argument.
S
char*
Python string without embedded nulls to C char*.
s#
char*+int
Any Python string to C address and length.
t#
char*+int
Read-only single-segment buffer to C address and length.
u
Py_UNICODE*
Python Unicode without embedded nulls to C.
u#
Py_UNICODE*+int
Any Python Unicode C address and length.
w#
char*+int
Read/write single-segment buffer to C address and length.
z
char*
Like s, also accepts None (sets C char* to NULL).
z#
char*+int
Like s#, also accepts None (sets C char* to NULL).
(…)
as per …
A Python sequence is treated as one argument per item.
|
The following arguments are optional.
:
Format end, followed by function name for error messages.
;
Format end, followed by entire error message text.
Returning Values
Py_BuildValue takes in a format string much like PyArg_ParseTuple does. Instead of passing in the addresses of the values you are building, you pass in the actual values. Here is an example showing how to implement an add function.
This is what it would look like if implemented in Python −
defadd(a, b):return(a + b)
You can return two values from your function as follows. This would be captured using a list in Python.
static PyObject *foo_add_subtract(PyObject *self, PyObject *args){int a;int b;if(!PyArg_ParseTuple(args,"ii",&a,&b)){return NULL;}return Py_BuildValue("ii", a + b, a - b);}
This is what it would look like if implemented in Python −
defadd_subtract(a, b):return(a + b, a - b)
The Py_BuildValue Function
Here is the standard signature for Py_BuildValue function −
PyObject* Py_BuildValue(char*format,...)
Here format is a C string that describes the Python object to build. The following arguments of Py_BuildValue are C values from which the result is built. ThePyObject* result is a new reference.
The following table lists the commonly used code strings, of which zero or more are joined into a string format.
Code
C type
Meaning
c
char
A C char becomes a Python string of length 1.
d
double
A C double becomes a Python float.
f
float
A C float becomes a Python float.
i
int
C int becomes a Python int
l
long
A C long becomes a Python int
N
PyObject*
Passes a Python object and steals a reference.
O
PyObject*
Passes a Python object and INCREFs it as normal.
O&
convert+void*
Arbitrary conversion
s
char*
C 0-terminated char* to Python string, or NULL to None.
s#
char*+int
C char* and length to Python string, or NULL to None.
u
Py_UNICODE*
C-wide, null-terminated string to Python Unicode, or NULL to None.
u#
Py_UNICODE*+int
C-wide string and length to Python Unicode, or NULL to None.
w#
char*+int
Read/write single-segment buffer to C address and length.
z
char*
Like s, also accepts None (sets C char* to NULL).
z#
char*+int
Like s#, also accepts None (sets C char* to NULL).
(…)
as per …
Builds Python tuple from C values.
[…]
as per …
Builds Python list from C values.
{…}
as per …
Builds Python dictionary from C values, alternating keys and values.
Code {…} builds dictionaries from an even number of C values, alternately keys and values. For example, Py_BuildValue(“{issi}”,23,”zig”,”zag”,42) returns a dictionary like Python’s {23:’zig’,’zag’:42}
You can send email in Python by using several libraries, but the most common ones are smtplib and email.
The “smtplib” module in Python defines an SMTP client session object that can be used to send mail to any Internet machine with an SMTP or ESMTP listener daemon. The email “package” is a library for managing email messages, including MIME and other RFC 2822-based message documents.
An application that handles and delivers e-mail over the Internet is called a “mail server”. Simple Mail Transfer Protocol (SMTP) is a protocol, which handles sending an e-mail and routing e-mail between mail servers. It is an Internet standard for email transmission.
Python smptlib.SMTP() Function
The Python smtplib.SMTP() function is used to create an SMTP client session object, which establishes a connection to an SMTP server. This connection allows you to send emails through the server.
Setting Up an SMTP Server
Before sending an email, you need to set up an SMTP server. Common SMTP servers include those provided by Gmail, Yahoo, or other mail service providers.
Creating an SMTP Object
To send an email, you need to obtain the object of SMTP class with the following function −
import smtplib

smtpObj = smtplib.SMTP([host [, port [, local_hostname]]])
Here is the detail of the parameters −
host − This is the host running your SMTP server. You can specify IP address of the host or a domain name like tutorialspoint.com. This is an optional argument.
port − If you are providing host argument, then you need to specify a port, where SMTP server is listening. Usually this port would be 25.
local_hostname − If your SMTP server is running on your local machine, then you can specify just localhost as the option.
Example
The following script connects to the SMTP server at “smtp.example.com” on port 25, optionally identifies and secures the connection, logs in (if required), sends an email, and then quits the session −
import smtplib

# Create an SMTP object and establish a connection to the SMTP server
smtpObj = smtplib.SMTP('smtp.example.com',25)# Identify yourself to an ESMTP server using EHLO
smtpObj.ehlo()# Secure the SMTP connection
smtpObj.starttls()# Login to the server (if required)
smtpObj.login('username','password')# Send an email
from_address ='[email protected]'
to_address ='[email protected]'
message ="""\
Subject: Test Email

This is a test email message.
"""

smtpObj.sendmail(from_address, to_address, message)# Quit the SMTP session
smtpObj.quit()
The Python smtpd Module
The Python smtpd module is used to create and manage a simple Mail Transfer Protocol (SMTP) server. This module allows you to set up an SMTP server that can receive and process incoming email messages, making it valuable for testing and debugging email functionalities within applications.
Setting Up an SMTP Debugging Server
The smtpd module comes pre-installed with Python and includes a local SMTP debugging server. This server is useful for testing email functionality without actually sending emails to specified addresses; instead, it prints the email content to the console.
Running this local server eliminates the need to handle message encryption or use credentials to log in to an email server.
Starting the SMTP Debugging Server
You can start the local SMTP debugging server using the following command in Command Prompt or terminal −
The following example demonstrates how to send a dummy email using the smtplib functionality along with the local SMTP debugging server −
import smtplib

defprompt(prompt):returninput(prompt).strip()

fromaddr = prompt("From: ")
toaddrs = prompt("To: ").split()print("Enter message, end with ^D (Unix) or ^Z (Windows):")# Add the From: and To: headers at the start!
msg =("From: %s\r\nTo: %s\r\n\r\n"%(fromaddr,", ".join(toaddrs)))whileTrue:try:
      line =input()except EOFError:breakifnot line:break
   msg = msg + line

print("Message length is",len(msg))
server = smtplib.SMTP('localhost',1025)
server.set_debuglevel(1)
server.sendmail(fromaddr, toaddrs, msg)
server.quit()
In this example −
From − You input the sender’s email address (fromaddr).
To − You input the recipient’s email address (toaddrs), which can be multiple addresses separated by spaces.
Message − You input the message content, terminated by ^D (Unix) or ^Z (Windows).
The sendmail() method of “smtplib” sends the email using the specified sender, recipient(s), and message content to the local SMTP debugging server running on “localhost” at port “1025”.
Output
When you run the program, the console outputs the communication between the program and the SMTP server. Meanwhile, the terminal running the SMTPD server displays the incoming message content, helping you debug and verify the email sending process.
To send an HTML email using Python, you can use the smtplib library to connect to an SMTP server and the email.mime modules to construct and format your email content appropriately.
Constructing the HTML Email Message
When sending an HTML email, you need to specify certain headers and structure the message content accordingly to ensure it is recognized and rendered as HTML by the recipient’s email client.
Example
Following is the example to send HTML content as an e-mail in Python −
import smtplib
from email.mime.multipart import MIMEMultipart
from email.mime.text import MIMEText

# Email content
sender ='[email protected]'
receivers =['[email protected]']# Create message container - the correct MIME type is multipart/alternative.
msg = MIMEMultipart('alternative')
msg['From']='From Person <[email protected]>'
msg['To']='To Person <[email protected]>'
msg['Subject']='SMTP HTML e-mail test'# HTML message content
html ="""\
<html>
  <head></head>
  <body>
    <p>This is an e-mail message to be sent in <b>HTML format</b></p>
    <p><b>This is HTML message.</b></p>
    <h1>This is headline.</h1>
  </body>
</html>
"""# Attach HTML content to the email
part2 = MIMEText(html,'html')
msg.attach(part2)# Connect to SMTP server and send emailtry:
   smtpObj = smtplib.SMTP('localhost')
   smtpObj.sendmail(sender, receivers, msg.as_string())print("Successfully sent email")except smtplib.SMTPException as e:print(f"Error: unable to send email. Error message: {str(e)}")
Sending Attachments as an E-mail
To send email attachments in Python, you can use the smtplib library to connect to an SMTP server and the email.mime modules to construct and format your email content, including attachments.
Constructing an Email with Attachments
When sending an email with attachments, you need to format the email correctly using MIME (Multipurpose Internet Mail Extensions). This involves setting the Content-Type header to multipart/mixed to denote that the email contains both text and attachments. Each part of the email (text and attachments) is separated by boundaries.
Example
Following is the example, which sends an email with a file /tmp/test.txt as an attachment −
import smtplib
import base64

filename ="/tmp/test.txt"# Read a file and encode it into base64 format
fo =open(filename,"rb")
filecontent = fo.read()
encodedcontent = base64.b64encode(filecontent)# base64

sender ='[email protected]'
reciever ='[email protected]'

marker ="AUNIQUEMARKER"

body ="""
This is a test email to send an attachment.
"""# Define the main headers.
part1 ="""From: From Person <[email protected]>
To: To Person <[email protected]>
Subject: Sending Attachment
MIME-Version: 1.0
Content-Type: multipart/mixed; boundary=%s
--%s
"""%(marker, marker)# Define the message action
part2 ="""Content-Type: text/plain
Content-Transfer-Encoding:8bit

%s
--%s
"""%(body,marker)# Define the attachment section
part3 ="""Content-Type: multipart/mixed; name=\"%s\"
Content-Transfer-Encoding:base64
Content-Disposition: attachment; filename=%s

%s
--%s--
"""%(filename, filename, encodedcontent, marker)
message = part1 + part2 + part3

try:
   smtpObj = smtplib.SMTP('localhost')
   smtpObj.sendmail(sender, reciever, message)print"Successfully sent email"except Exception:print"Error: unable to send email"
Sending Email Using Gmail’s SMTP Server
To send an email using Gmail’s SMTP server in Python, you need to set up a connection to smtp.gmail.com on port “587” with “TLS” encryption, authenticate using your Gmail credentials, construct the email message using Python’s smtplib and email.mime libraries, and send it using the sendmail() method. Finally, close the SMTP connection with quit().
Example
Following is an example script that demonstrates how to send an email using Gmail’s SMTP server −
import smtplib

# Email content
content ="Hello World"# Set up SMTP connection to Gmail's SMTP server
mail = smtplib.SMTP('smtp.gmail.com',587)# Identify yourself to the SMTP server
mail.ehlo()# Start TLS encryption for the connection
mail.starttls()# Gmail account credentials
sender ='[email protected]'
password ='your_password'# Login to Gmail's SMTP server
mail.login(sender, password)# Email details
recipient ='[email protected]'
subject ='Test Email'# Construct email message with headers
header =f'To: {recipient}\nFrom: {sender}\nSubject: {subject}\n'
content = header + content

# Send email
mail.sendmail(sender, recipient, content)# Close SMTP connection
mail.quit()
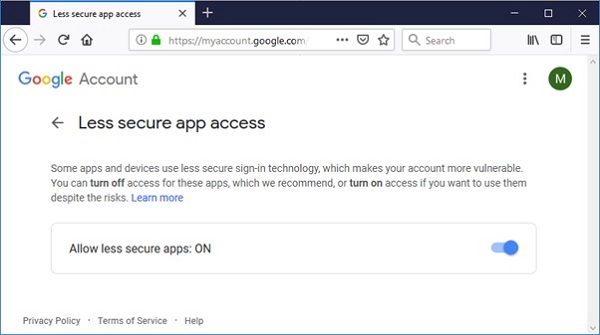
Before running above script, sender’s gmail account must be configured to allow access for ‘less secure apps’. Visit following link.
JSON in Python is a popular data format used for data exchange between systems. The json module provides functions to work with JSON data, allowing you to serialize Python objects into JSON strings and deserialize JSON strings back into Python objects.
JSON (JavaScript Object Notation) is a lightweight data interchange format that is easy for humans to read and write, and easy for machines to parse and generate. It is mainly used to transmit data between a server and web application as text.
JSON Serialization
JSON serialization is the process of converting a Python object into a JSON format. This is useful for saving data in a format that can be easily transmitted or stored, and later reconstructed back into its original form.
Python provides the json module to handle JSON serialization and deserialization. We can use the json.dumps() method for serialization in this module.
You can serialize the following Python object types into JSON strings −
dict
list
tuple
str
int
float
bool
None
Example
Following a basic example of how to serialize a Python dictionary into a JSON string −
import json

# Python dictionary
data ={"name":"Alice","age":30,"city":"New York"}# Serialize to JSON string
json_string = json.dumps(data)print(json_string)
It will produce the following output −
{"name": "Alice", "age": 30, "city": "New York"}
JSON Deserialization
JSON deserialization is the process of converting a JSON string back into a Python object. This is essential for reading and processing data that has been transmitted or stored in JSON format.
In Python, we can use json.loads() method to deserialize JSON data from a string, and json.load() method to deserialize JSON data from a file.
Example: Deserialize JSON string to Python object
In the following example we are deserializing a JSON string into a Python dictionary using the json.loads() method −
If your JSON data includes objects that need special handling (e.g., custom classes), you can define custom deserialization functions. Use the object_hook parameter of json.loads() or json.load() method to specify a function that will be called with the result of every JSON object decoded.
Example
In the example below, we are demonstrating the usage of custom object serialization −
import json
from datetime import datetime

# Custom deserialization functiondefcustom_deserializer(dct):if'joined'in dct:
      dct['joined']= datetime.fromisoformat(dct['joined'])return dct

# JSON string with datetime
json_string ='{"name": "John", "joined": "2021-05-17T10:15:00"}'# Deserialize with custom function
python_obj = json.loads(json_string, object_hook=custom_deserializer)print(python_obj)
The JSONEncoder class in Python is used to encode Python data structures into JSON format. Each Python data type is converted into its corresponding JSON type, as shown in the following table −
Python
JSON
Dict
object
list, tuple
array
Str
string
int, float, int- & float-derived Enums
number
True
true
False
false
None
null
The JSONEncoder class is instantiated using the JSONEncoder() constructor. The following important methods are defined in this class −
encode(obj) − Serializes a Python object into a JSON formatted string.
iterencode(obj) − Encodes the object and returns an iterator that yields the encoded form of each item in the object.
indent − Determines the indent level of the encoded string.
sort_keys − If True, the keys appear in sorted order.
check_circular − If True, checks for circular references in container-type objects.
Example
In the following example, we are encoding Python list object. We use the iterencode() method to display each part of the encoded string −
import json

data =['Rakesh',{'marks':(50,60,70)}]
e = json.JSONEncoder()# Using iterencode() method for obj in e.iterencode(data):print(obj)
It will produce the following output −
["Rakesh", { "marks" : [50, 60, 70]}]
JSONDecoder class
The JSONDecoder class is used to decode a JSON string back into a Python data structure. The main method in this class is decode().
Example
In this example, the “JSONEncoder” is used to encode a Python list into a JSON string, and the “JSONDecoder” is then used to decode the JSON string back into a Python list −
import json

data =['Rakesh',{'marks':(50,60,70)}]
e = json.JSONEncoder()
s = e.encode(data)
d = json.JSONDecoder()
obj = d.decode(s)print(obj,type(obj))
The json module in Python provides methods for working with JSON (JavaScript Object Notation). It allows you to serialize and deserialize Python objects to and from JSON format, which is a commonly used data interchange format.
Core Functions
The core functions in the json module allow you to serialize and deserialize JSON data.
Sr.No.
Function & Description
1
json.dump()Serializes a Python object and writes it to a file-like object.
2
json.dumps()Serializes a Python object and returns it as a JSON-formatted string.
3
json.load()Deserializes a JSON-formatted stream into a Python object.
4
json.loads()Deserializes a JSON-formatted string into a Python object.
JSON Encoder Methods
JSON encoder methods handle the conversion of Python objects to JSON format.
Sr.No.
Function & Description
1
json.JSONEncoderEncoder class for converting Python objects to JSON format.
2
json.JSONEncoder.encode()Encodes a Python object to JSON format as a string.
3
json.JSONEncoder.iterencode()Encodes a Python object to JSON format in an iterator style.
4
json.JSONEncoder.default()Override method to handle objects that are not serializable by default.
JSON Decoder Methods
JSON decoder methods handle the conversion of JSON data into Python objects.
Sr.No.
Function & Description
1
json.JSONDecoderDecoder class for converting JSON data to Python objects.
2
json.JSONDecoder.decode()Deserializes a JSON string into a Python object.
3
json.JSONDecoder.raw_decode()Deserializes a JSON string with extra information for error handling.
Utility Functions
Utility functions provide a simple way to process JSON data in Python.
Sr.No.
Function & Description
1
json.tool Provides a command-line tool to format JSON data for better readability.
Dunder (Magic) Methods in JSONEncoder
These are the special methods for the JSONEncoder class in the json module that enable custom behavior for JSON serialization.
Sr.No.
Method & Description
1
json.JSONEncoder.__init__Initializes the encoder with custom settings.
2
json.JSONEncoder.__repr__Returns a string representation of the encoder object.
3
json.JSONEncoder.__str__Returns a string version of the encoder object.
Dunder (Magic) Methods in JSONDecoder
These are the special methods for the JSONDecoder class that enable custom behavior for JSON deserialization.
Sr.No.
Method & Description
1
json.JSONDecoder.__init__Initializes the decoder with custom settings.
2
json.JSONDecoder.__repr__Returns a string representation of the decoder object.
3
json.JSONDecoder.__str__Returns a string version of the decoder object.
Functions in json.encoder (Internal Utility Functions)
These functions are used internally in the json.encoder module to handle specific encoding tasks.
Sr.No.
Function & Description
1
json.encoder.encode_basestring()Encodes a string into a JSON-compatible format.
2
json.encoder.encode_basestring_ascii()Encodes a string into a JSON-compatible ASCII format.
Functions in json.decoder (Internal Utility Functions)
These functions are used internally in the json.decoder module to handle specific decoding tasks.
Sr.No.
Function & Description
1
json.decoder.scanstring()Scans a string in JSON format.
In Python, docstrings are a way of documenting modules, classes, functions, and methods. They are written within triple quotes (“”” “””) and can span multiple lines.
Docstrings serve as convenient way of associating documentation with Python code. They are accessible through the __doc__ attribute of the respective Python objects they document. Below are the different ways to write docstrings −
Single-Line Docstrings
Single-line docstrings are used for brief and simple documentation. They provide a concise description of what the function or method does. Single-line docstrings should fit on one line within triple quotes and end with a period.
Example
In the following example, we are using a single line docstring to write a text −
defadd(a, b):"""Return the sum of two numbers."""return a + b

result = add(5,3)print("Sum:", result)
Multi-Line Docstrings
Multi-line docstrings are used for more detailed documentation. They provide a more comprehensive description, including the parameters, return values, and other relevant details. Multi-line docstrings start and end with triple quotes and include a summary line followed by a blank line and a more detailed description.
Example
The following example uses multi-line docstrings as an explanation of the code −
defmultiply(a, b):"""
   Multiply two numbers and return the result.

   Parameters:
   a (int or float): The first number.
   b (int or float): The second number.

   Returns:
   int or float: The result of multiplying a and b.
   """return a * b
result = multiply(5,3)print("Product:", result)
Docstrings for Modules
When writing docstrings for modules, place the docstring at the top of the module, right after any import statements. The module docstring provide an overview of the module’s functionality and list its primary components, such as list of functions, classes, and exceptions provided by the module.
Example
In this example, we demonstrate the use of docstrings for modules in Python −
import os

"""
This module provides Utility functions for file handling operations.

Functions:
- 'read_file(filepath)': Reads and returns the contents of the file.
- 'write_file(filepath, content)': Writes content to the specified file.

Classes:
- 'FileNotFoundError': Raised when a file is not found.

Example usage:

   >>> import file_utils
   >>> content = file_utils.read_file("example.txt")
   >>> print(content)
   'Hello, world!'
   >>> file_utils.write_file("output.txt", "This is a test.")
"""print("This is os module")
Docstrings for Classes
Classes can have docstrings to describe their purpose and usage. Each method within the class can also have its own docstring. The class docstring should provide an overview of the class and its methods.
Example
In the example below, we showcase the use of docstrings for classes in Python −
classCalculator:"""
   A simple calculator class to perform basic arithmetic operations.

   Methods:
   - add(a, b): Return the sum of two numbers.
   - multiply(a, b): Return the product of two numbers.
   """defadd(self, a, b):"""Return the sum of two numbers."""return a + b

   defmultiply(self, a, b):"""
      Multiply two numbers and return the result.

      Parameters:
      a (int or float): The first number.
      b (int or float): The second number.

      Returns:
      int or float: The result of multiplying a and b.
      """return a * b

cal = Calculator()print(cal.add(87,98))print(cal.multiply(87,98))
Accessing Docstrings
Docstrings in Python are accessed using the __doc__ attribute of the object they document. This attribute contains the documentation string (docstring) associated with the object, providing a way to access and display information about the purpose and usage of functions, classes, modules, or methods.
Example
In the following example, we are defining two functions, “add” and “multiply”, each with a docstring describing their parameters and return values. We then use the “__doc__” attribute to access and print these docstrings −
# Define a function with a docstringdefadd(a, b):"""
    Adds two numbers together.

    Parameters:
    a (int): The first number.
    b (int): The second number.

    Returns:
    int: The sum of a and b.
    """return a + b
result = add(5,3)print("Sum:", result)# Define another function with a docstringdefmultiply(x, y):"""
    Multiplies two numbers together.

    Parameters:
    x (int): The first number.
    y (int): The second number.

    Returns:
    int: The product of x and y.
    """return x * y
result = multiply(4,7)print("Product:", result)# Accessing the docstringsprint(add.__doc__)print(multiply.__doc__)
Best Practices for Writing Docstrings
Following are the best practices for writing docstrings in Python −
Be Clear and Concise − Ensure the docstring clearly explains the purpose and usage of the code, avoiding unnecessary details.
Use Proper Grammar and Spelling − Ensure the docstring is well-written with correct grammar and spelling.
Follow Conventions − Use the standard conventions for formatting docstrings, such as the Google style, NumPy style, or Sphinx style.
Include Examples − Provide examples where applicable to illustrate how to use the documented code.
Google Style Docstring
Google style docstrings provide a structured way to document Python code using indentation and headings. They are designed to be readable and informative, following a specific format.
Example
Following is an example of a function with a Google style docstring −
defdivide(dividend, divisor):"""
   Divide two numbers and return the result.

   Args:
      dividend (float): The number to be divided.
      divisor (float): The number to divide by.

   Returns:
      float: The result of the division.

   Raises:
      ValueError: If `divisor` is zero.
   """if divisor ==0:raise ValueError("Cannot divide by zero")return dividend / divisor

result = divide(4,7)print("Division:", result)
NumPy/SciPy Style Docstring
NumPy/SciPy style docstrings are common in scientific computing. They include sections for parameters, returns, and examples.
Example
Following is an example of a function with a NumPy/SciPy style docstring −
deffibonacci(n):"""
   Compute the nth Fibonacci number.

   Parameters
   ----------
   n : int
      The index of the Fibonacci number to compute.

   Returns
   -------
   int
      The nth Fibonacci number.

   Examples
   --------
   >>> fibonacci(0)
   0
   >>> fibonacci(5)
   5
   >>> fibonacci(10)
   55
   """if n ==0:return0elif n ==1:return1else:return fibonacci(n-1)+ fibonacci(n-2)

result = fibonacci(4)print("Result:", result)
Sphinx Style Docstring
Sphinx style docstrings are compatible with the Sphinx documentation generator and use reStructuredText formatting.
The reStructuredText (reST) is a lightweight markup language used for creating structured text documents. The Sphinx documentation generator takes “reStructuredText” files as input and generates high-quality documentation in various formats, including HTML, PDF, ePub, and more.
Example
Following is an example of a function with a Sphinx style docstring −
defdivide(dividend, divisor):"""
   Divide two numbers and return the result.

   Args:
      dividend (float): The number to be divided.
      divisor (float): The number to divide by.

   Returns:
      float: The result of the division.

   Raises:
      ValueError: If `divisor` is zero.
   """if divisor ==0:raise ValueError("Cannot divide by zero")return dividend / divisor

result = divide(76,37)print("Result:", result)
Docstring vs Comment
Following are the differences highlighted between Python docstrings and comments, focusing on their purposes, formats, usages, and accessibility respectively −
Docstring
Comment
Used to document Python objects such as functions, classes, methods, modules, or packages.
Used to annotate code for human readers, provide context, or temporarily disable code.
Written within triple quotes (“”” “”” or ”’ ”’) and placed immediately after the object’s definition.
Start with the # symbol and are placed on the same line as the annotated code.
Stored as an attribute of the object and accessible programmatically.
Ignored by the Python interpreter during execution, purely for human understanding.
Accessed using the __doc__ attribute of the object.
Not accessible programmatically; exists only in the source code.