Blog

  • Python – Command-Line Arguments

    Python Command Line Arguments

    Python Command Line Arguments provides a convenient way to accept some information at the command line while running the program. We usually pass these values along with the name of the Python script.

    To run a Python program, we execute the following command in the command prompt terminal of the operating system. For example, in windows, the following command is entered in Windows command prompt terminal.

    $ python script.py arg1 arg2 arg3
    

    Here Python script name is script.py and rest of the three arguments – arg1 arg2 arg3 are command line arguments for the program.

    If the program needs to accept input from the user, Python’s input() function is used. When the program is executed from command line, user input is accepted from the command terminal.

    Example

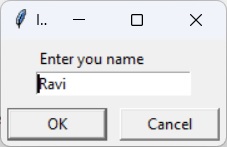
    name =input("Enter your name: ")print("Hello {}. How are you?".format(name))

    The program is run from the command prompt terminal as follows −

    command prompt

    Passing Arguments at the Time of Execution

    Very often, you may need to put the data to be used by the program in the command line itself and use it inside the program. An example of giving the data in the command line could be any DOS commands in Windows or Linux.

    In Windows, you use the following DOS command to rename a file hello.py to hi.py.

    C:\Python311>ren hello.py hi.py
    

    In Linux you may use the mv command −

    $ mv hello.py hi.py
    

    Here ren or mv are the commands which need the old and new file names. Since they are put in line with the command, they are called command-line arguments.

    You can pass values to a Python program from command line. Python collects the arguments in a list object. Python’s sys module provides access to any command-line arguments via the sys.argv variable. sys.argv is the list of command-line arguments and sys.argv[0] is the program i.e. the script name.

    Example

    The hello.py script used input() function to accept user input after the script is run. Let us change it to accept input from command line.

    import sys
    print('argument list', sys.argv)
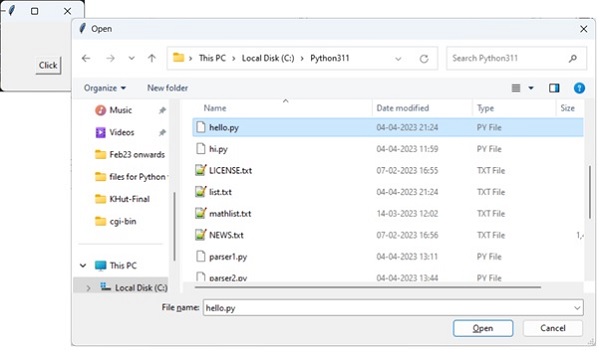
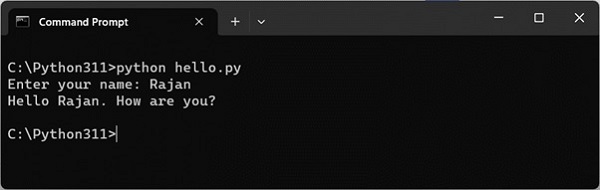
    name = sys.argv[1]print("Hello {}. How are you?".format(name))

    Run the program from command-line as shown in the following figure −

    command-line

    The output is shown below −

    C:\Python311>python hello.py Rajan
    argument list ['hello.py', 'Rajan']
    Hello Rajan. How are you?
    

    The command-line arguments are always stored in string variables. To use them as numerics, you can them suitably with type conversion functions.

    Example

    In the following example, two numbers are entered as command-line arguments. Inside the program, we use int() function to parse them as integer variables.

    import sys
    print('argument list', sys.argv)
    first =int(sys.argv[1])
    second =int(sys.argv[2])print("sum = {}".format(first+second))

    It will produce the following output −

    C:\Python311>python hello.py 1020
    argument list['hello.py','10','20']sum=30

    Python’s standard library includes a couple of useful modules to parse command line arguments and options −

    • getopt − C-style parser for command line options.
    • argparse − Parser for command-line options, arguments and sub-commands.

    Python getopt Module

    Python provides a getopt module that helps you parse command-line options and arguments. This module provides two functions and an exception to enable command line argument parsing.

    getopt.getopt() method

    This method parses the command line options and parameter list. Following is a simple syntax for this method −

    getopt.getopt(args, options,[long_options])

    Here is the detail of the parameters −

    • args − This is the argument list to be parsed.
    • options − This is the string of option letters that the script wants to recognize, with options that require an argument should be followed by a colon (:).
    • long_options − This is an optional parameter and if specified, must be a list of strings with the names of the long options, which should be supported. Long options, which require an argument should be followed by an equal sign (‘=’). To accept only long options, options should be an empty string.

    This method returns a value consisting of two elements − the first is a list of (option, value) pairs, the second is a list of program arguments left after the option list was stripped.

    Each option-and-value pair returned has the option as its first element, prefixed with a hyphen for short options (e.g., ‘-x’) or two hyphens for long options (e.g., ‘–long-option’).

    Exception getopt.GetoptError

    This is raised when an unrecognized option is found in the argument list or when an option requiring an argument is given none.

    The argument to the exception is a string indicating the cause of the error. The attributes msg and opt give the error message and related option.

    Example

    Suppose we want to pass two file names through command line and we also want to give an option to check the usage of the script. Usage of the script is as follows −

    usage: test.py -i <inputfile>-o <outputfile>

    Here is the following script to test.py −

    import sys, getopt
    defmain(argv):
       inputfile =''
       outputfile =''try:
          opts, args = getopt.getopt(argv,"hi:o:",["ifile=","ofile="])except getopt.GetoptError:print('test.py -i <inputfile> -o <outputfile>')
          sys.exit(2)for opt, arg in opts:if opt =='-h':print('test.py -i <inputfile> -o <outputfile>')
             sys.exit()elif opt in("-i","--ifile"):
             inputfile = arg
          elif opt in("-o","--ofile"):
             outputfile = arg
       print('Input file is "', inputfile)print('Output file is "', outputfile)if __name__ =="__main__":
       main(sys.argv[1:])

    Now, run the above script as follows −

    $ test.py -h
    usage: test.py -i <inputfile> -o <outputfile>
    $ test.py -i BMP -o
    usage: test.py -i <inputfile> -o <outputfile>
    $ test.py -i inputfile -o outputfile
    Input file is " inputfile
    Output file is " outputfile
    

    Python argparse Module

    The argparse module provides tools for writing very easy to use command line interfaces. It handles how to parse the arguments collected in sys.argv list, automatically generate help and issues error message when invalid options are given.

    First step to design the command line interface is to set up parser object. This is done by ArgumentParser() function in argparse module. The function can be given an explanatory string as description parameter.

    To start with our script will be executed from command line without any arguments. Still use parse_args() method of parser object, which does nothing because there aren’t any arguments given.

    import argparse
    parser=argparse.ArgumentParser(description="sample argument parser")
    args=parser.parse_args()

    When the above script is run −

    C:\Python311>python parser1.py
    C:\Python311>python parser1.py -h
    usage: parser1.py [-h]
    sample argument parser
    options:-h,--help show this help message and exit
    

    The second command line usage gives −help option which produces a help message as shown. The −help parameter is available by default.

    Now let us define an argument which is mandatory for the script to run and if not given script should throw error. Here we define argument ‘user’ by add_argument() method.

    import argparse
    parser=argparse.ArgumentParser(description="sample argument parser")
    parser.add_argument("user")
    args=parser.parse_args()if args.user=="Admin":print("Hello Admin")else:print("Hello Guest")

    This script’s help now shows one positional argument in the form of ‘user’. The program checks if it’s value is ‘Admin’ or not and prints corresponding message.

    C:\Python311>python parser2.py --help
    usage: parser2.py [-h] user
    sample argument parser
    positional arguments:
       user
    options:-h,--help show this help message and exit
    

    Use the following command −

    C:\Python311>python parser2.py Admin
    Hello Admin
    

    But the following usage displays Hello Guest message.

    C:\Python311>python parser2.py Rajan
    Hello Guest
    

    The add_argument() method

    We can assign default value to an argument in add_argument() method.

    import argparse
    parser=argparse.ArgumentParser(description="sample argument parser")
    parser.add_argument("user", nargs='?',default="Admin")
    args=parser.parse_args()if args.user=="Admin":print("Hello Admin")else:print("Hello Guest")

    Here nargs is the number of command-line arguments that should be consumed. ‘?’. One argument will be consumed from the command line if possible, and produced as a single item. If no command-line argument is present, the value from default will be produced.

    By default, all arguments are treated as strings. To explicitly mention type of argument, use type parameter in the add_argument() method. All Python data types are valid values of type.

    import argparse
    parser=argparse.ArgumentParser(description="add numbers")
    parser.add_argument("first",type=int)
    parser.add_argument("second",type=int)
    args=parser.parse_args()
    x=args.first
    y=args.second
    z=x+y
    print('addition of {} and {} = {}'.format(x,y,z))

    It will produce the following output −

    C:\Python311>python parser3.py 10 20
    addition of 10 and 20 = 30
    

    In the above examples, the arguments are mandatory. To add optional argument, prefix its name by double dash –. In following case surname argument is optional because it is prefixed by double dash (–surname).

    import argparse
    parser=argparse.ArgumentParser()
    parser.add_argument("name")
    parser.add_argument("--surname")
    args=parser.parse_args()print("My name is ", args.name, end=' ')if args.surname:print(args.surname)

    A one letter name of argument prefixed by single dash acts as a short name option.

    C:\Python311>python parser3.py Anup
    My name is Anup
    C:\Python311>python parser3.py Anup --surname Gupta
    My name is Anup Gupta
    

    If it is desired that an argument should value only from a defined list, it is defined as choices parameter.

    import argparse
    parser=argparse.ArgumentParser()
    parser.add_argument("sub", choices=['Physics','Maths','Biology'])
    args=parser.parse_args()print("My subject is ", args.sub)

    Note that if value of parameter is not from the list, invalid choice error is displayed.

    C:\Python311>python parser3.py Physics
    My subject is Physics
    C:\Python311>python parser3.py History
    usage: parser3.py [-h] {Physics,Maths,Biology}
    parser3.py: error: argument sub: invalid choice: 'History' (choose from
    'Physics', 'Maths', 'Biology')
  • Python – GUI Programming

    Python provides various options for developing graphical user interfaces (GUIs). The most important features are listed below.

    • Tkinter − Tkinter is the Python interface to the Tk GUI toolkit shipped with Python. We would look at this option in this chapter.
    • wxPython − This is an open-source Python interface for wxWidgets GUI toolkit. You can find a complete tutorial on WxPython here.
    • PyQt − This is also a Python interface for a popular cross-platform Qt GUI library. TutorialsPoint has a very good tutorial on PyQt5 here.
    • PyGTK − PyGTK is a set of wrappers written in Python and C for GTK + GUI library. The complete PyGTK tutorial is available here.
    • PySimpleGUI − PySimpleGui is an open source, cross-platform GUI library for Python. It aims to provide a uniform API for creating desktop GUIs based on Python’s Tkinter, PySide and WxPython toolkits. For a detaile PySimpleGUI tutorial, click here.
    • Pygame − Pygame is a popular Python library used for developing video games. It is free, open source and cross-platform wrapper around Simple DirectMedia Library (SDL). For a comprehensive tutorial on Pygame, visit this link.
    • Jython − Jython is a Python port for Java, which gives Python scripts seamless access to the Java class libraries on the local machinehttp: //www.jython.org.

    There are many other interfaces available, which you can find them on the net.

    Tkinter Programming

    Tkinter is the standard GUI library for Python. Python when combined with Tkinter provides a fast and easy way to create GUI applications. Tkinter provides a powerful object-oriented interface to the Tk GUI toolkit.

    The tkinter package includes following modules −

    • Tkinter − Main Tkinter module.
    • tkinter.colorchooser − Dialog to let the user choose a color.
    • tkinter.commondialog − Base class for the dialogs defined in the other modules listed here.
    • tkinter.filedialog − Common dialogs to allow the user to specify a file to open or save.
    • tkinter.font − Utilities to help work with fonts.
    • tkinter.messagebox − Access to standard Tk dialog boxes.
    • tkinter.scrolledtext − Text widget with a vertical scroll bar built in.
    • tkinter.simpledialog − Basic dialogs and convenience functions.
    • tkinter.ttk − Themed widget set introduced in Tk 8.5, providing modern alternatives for many of the classic widgets in the main tkinter module.

    Creating a GUI application using Tkinter is an easy task. All you need to do is perform the following steps.

    • Import the Tkinter module.
    • Create the GUI application main window.
    • Add one or more of the above-mentioned widgets to the GUI application.
    • Enter the main event loop to take action against each event triggered by the user.

    Example

    # note that module name has changed from Tkinter in Python 2# to tkinter in Python 3import tkinter
    top = tkinter.Tk()# Code to add widgets will go here...
    top.mainloop()

    This would create a following window −

    Tkinter Programming

    When the program becomes more complex, using an object-oriented programming approach makes the code more organized.

    import tkinter as tk
    classApp(tk.Tk):def__init__(self):super().__init__()
    
    app = App()
    app.mainloop()

    Tkinter Widgets

    Tkinter provides various controls, such as buttons, labels and text boxes used in a GUI application. These controls are commonly called widgets.

    There are currently 15 types of widgets in Tkinter. We present these widgets as well as a brief description in the following table −

    Sr.No.Operator & Description
    1ButtonThe Button widget is used to display the buttons in your application.
    2Canvas The Canvas widget is used to draw shapes, such as lines, ovals, polygons and rectangles, in your application.
    3Checkbutton The Checkbutton widget is used to display a number of options as checkboxes. The user can select multiple options at a time.
    4Entry The Entry widget is used to display a single-line text field for accepting values from a user.
    5Frame The Frame widget is used as a container widget to organize other widgets.
    6Label The Label widget is used to provide a single-line caption for other widgets. It can also contain images.
    7Listbox The Listbox widget is used to provide a list of options to a user.
    8Menubutton The Menubutton widget is used to display menus in your application.
    9Menu The Menu widget is used to provide various commands to a user. These commands are contained inside Menubutton.
    10MessageThe Message widget is used to display multiline text fields for accepting values from a user.
    11RadiobuttonThe Radiobutton widget is used to display a number of options as radio buttons. The user can select only one option at a time.
    12ScaleThe Scale widget is used to provide a slider widget.
    13ScrollbarThe Scrollbar widget is used to add scrolling capability to various widgets, such as list boxes.
    14TextThe Text widget is used to display text in multiple lines.
    15ToplevelThe Toplevel widget is used to provide a separate window container.
    16SpinboxThe Spinbox widget is a variant of the standard Tkinter Entry widget, which can be used to select from a fixed number of values.
    17PanedWindowA PanedWindow is a container widget that may contain any number of panes, arranged horizontally or vertically.
    18LabelFrame A labelframe is a simple container widget. Its primary purpose is to act as a spacer or container for complex window layouts.
    19tkMessageBox This module is used to display message boxes in your applications.

    Let us study these widgets in detail.

    Standard Attributes

    Let us look at how some of the common attributes, such as sizes, colors and fonts are specified.

    • Dimensions
    • Colors
    • Fonts
    • Anchors
    • Relief styles
    • Bitmaps
    • Cursors

    Let us study them briefly −

    Geometry Management

    All Tkinter widgets have access to the specific geometry management methods, which have the purpose of organizing widgets throughout the parent widget area. Tkinter exposes the following geometry manager classes: pack, grid, and place.

    • The pack() Method − This geometry manager organizes widgets in blocks before placing them in the parent widget.
    • The grid() Method − This geometry manager organizes widgets in a table-like structure in the parent widget.
    • The place() Method − This geometry manager organizes widgets by placing them in a specific position in the parent widget.

    Let us study the geometry management methods briefly −

    SimpleDialog

    The simpledialog module in tkinter package includes a dialog class and convenience functions for accepting user input through a modal dialog. It consists of a label, an entry widget and two buttons Ok and Cancel. These functions are −

    • askfloat(title, prompt, **kw) − Accepts a floating point number.
    • askinteger(title, prompt, **kw) − Accepts an integer input.
    • askstring(title, prompt, **kw) − Accepts a text input from the user.

    The above three functions provide dialogs that prompt the user to enter a value of the desired type. If Ok is pressed, the input is returned, if Cancel is pressed, None is returned.

    askinteger

    from tkinter.simpledialog import askinteger
    from tkinter import*from tkinter import messagebox
    top = Tk()
    
    top.geometry("100x100")defshow():
       num = askinteger("Input","Input an Integer")print(num)
       
    B = Button(top, text ="Click", command = show)
    B.place(x=50,y=50)
    
    top.mainloop()

    It will produce the following output −

    SimpleDialog

    askfloat

    from tkinter.simpledialog import askfloat
    from tkinter import*
    top = Tk()
    
    top.geometry("100x100")defshow():
       num = askfloat("Input","Input a floating point number")print(num)
       
    B = Button(top, text ="Click", command = show)
    B.place(x=50,y=50)
    
    top.mainloop()

    It will produce the following output −

    askfloat

    askstring

    from tkinter.simpledialog import askstring
    from tkinter import*
    
    top = Tk()
    
    top.geometry("100x100")defshow():
       name = askstring("Input","Enter you name")print(name)
       
    B = Button(top, text ="Click", command = show)
    B.place(x=50,y=50)
    
    top.mainloop()

    It will produce the following output −

    askstring

    The FileDialog Module

    The filedialog module in Tkinter package includes a FileDialog class. It also defines convenience functions that enable the user to perform open file, save file, and open directory activities.

    • filedialog.asksaveasfilename()
    • filedialog.asksaveasfile()
    • filedialog.askopenfilename()
    • filedialog.askopenfile()
    • filedialog.askdirectory()
    • filedialog.askopenfilenames()
    • filedialog.askopenfiles()

    askopenfile

    This function lets the user choose a desired file from the filesystem. The file dialog window has Open and Cancel buttons. The file name along with its path is returned when Ok is pressed, None if Cancel is pressed.

    from tkinter.filedialog import askopenfile
    from tkinter import*
    
    top = Tk()
    
    top.geometry("100x100")defshow():
       filename = askopenfile()print(filename)
       
    B = Button(top, text ="Click", command = show)
    B.place(x=50,y=50)
    
    top.mainloop()

    It will produce the following output −

    askopenfile

    ColorChooser

    The colorchooser module included in tkinter package has the feature of letting the user choose a desired color object through the color dialog. The askcolor() function presents with the color dialog with predefined color swatches and facility to choose custome color by setting RGB values. The dialog returns a tuple of RGB values of chosen color as well as its hex value.

    from tkinter.colorchooser import askcolor
    from tkinter import*
    
    top = Tk()
    
    top.geometry("100x100")defshow():
       color = askcolor()print(color)
       
    B = Button(top, text ="Click", command = show)
    B.place(x=50,y=50)
    
    top.mainloop()

    It will produce the following output −

    ColorChooser
    ((0,255,0),'#00ff00')

    ttk module

    The term ttk stands from Tk Themed widgets. The ttk module was introduced with Tk 8.5 onwards. It provides additional benefits including anti-aliased font rendering under X11 and window transparency. It provides theming and styling support for Tkinter.

    The ttk module comes bundled with 18 widgets, out of which 12 are already present in Tkinter. Importing ttk over-writes these widgets with new ones which are designed to have a better and more modern look across all platforms.

    The 6 new widgets in ttk are, the Combobox, Separator, Sizegrip, Treeview, Notebook and ProgressBar.

    To override the basic Tk widgets, the import should follow the Tk import −

    from tkinter import*from tkinter.ttk import*

    The original Tk widgets are automatically replaced by tkinter.ttk widgets. They are Button, Checkbutton, Entry, Frame, Label, LabelFrame, Menubutton, PanedWindow, Radiobutton, Scale and Scrollbar.

    New widgets which gives a better look and feel across platforms; however, the replacement widgets are not completely compatible. The main difference is that widget options such as “fg”, “bg” and others related to widget styling are no longer present in Ttk widgets. Instead, use the ttk.Style class for improved styling effects.

    The new widgets in ttk module are −

    • Notebook − This widget manages a collection of “tabs” between which you can swap, changing the currently displayed window.
    • ProgressBar − This widget is used to show progress or the loading process through the use of animations.
    • Separator − Used to separate different widgets using a separator line.
    • Treeview − This widget is used to group together items in a tree-like hierarchy. Each item has a textual label, an optional image, and an optional list of data values.
    • ComboBox − Used to create a dropdown list of options from which the user can select one.
    • Sizegrip − Creates a little handle near the bottom-right of the screen, which can be used to resize the window.

    Combobox Widget

    The Python ttk Combobox presents a drop down list of options and displays them one at a time. It is a sub class of the widget Entry. Hence it inherits many options and methods from the Entry class.

    Syntax

    from tkinter import ttk
    
    Combo = ttk.Combobox(master, values.......)

    The get() function to retrieve the current value of the Combobox.

    Example

    from tkinter import*from tkinter import ttk
    
    top = Tk()
    top.geometry("200x150")
    
    frame = Frame(top)
    frame.pack()
    
    langs =["C","C++","Java","Python","PHP"]
       
    Combo = ttk.Combobox(frame, values = langs)
    Combo.set("Pick an Option")
    Combo.pack(padx =5, pady =5)
    top.mainloop()

    It will produce the following output −

    Combobox Widget

    Progressbar

    The ttk ProgressBar widget, and how it can be used to create loading screens or show the progress of a current task.

    Syntax

    ttk.Progressbar(parent, orient, length, mode)

    Parameters

    • Parent − The container in which the ProgressBar is to be placed, such as root or a Tkinter frame.
    • Orient − Defines the orientation of the ProgressBar, which can be either vertical of horizontal.
    • Length − Defines the width of the ProgressBar by taking in an integer value.
    • Mode − There are two options for this parameter, determinate and indeterminate.

    Example

    The code given below creates a progressbar with three buttons which are linked to three different functions.

    The first function increments the “value” or “progress” in the progressbar by 20. This is done with the step() function which takes an integer value to change progress amount. (Default is 1.0)

    The second function decrements the “value” or “progress” in the progressbar by 20.

    The third function prints out the current progress level in the progressbar.

    import tkinter as tk
    from tkinter import ttk
    
    root = tk.Tk()
    frame= ttk.Frame(root)defincrement():
       progressBar.step(20)defdecrement():
       progressBar.step(-20)defdisplay():print(progressBar["value"])
    
    progressBar= ttk.Progressbar(frame, mode='determinate')
    progressBar.pack(padx =10, pady =10)
    
    button= ttk.Button(frame, text="Increase", command= increment)
    button.pack(padx =10, pady =10, side = tk.LEFT)
    
    button= ttk.Button(frame, text="Decrease", command= decrement)
    button.pack(padx =10, pady =10, side = tk.LEFT)
    button= ttk.Button(frame, text="Display", command= display)
    button.pack(padx =10, pady =10, side = tk.LEFT)
    
    frame.pack(padx =5, pady =5)
    root.mainloop()

    It will produce the following output −

    Progressbar

    Notebook

    Tkinter ttk module has a new useful widget called Notebook. It is a of collection of of containers (e.g frames) which have many widgets as children inside.

    Each “tab” or “window” has a tab ID associated with it, which is used to determine which tab to swap to.

    You can swap between these containers like you would on a regular text editor.

    Syntax

    notebook = ttk.Notebook(master,*options)

    Example

    In this example, add 3 windows to our Notebook widget in two different ways. The first method involves the add() function, which simply appends a new tab to the end. The other method is the insert() function which can be used to add a tab to a specific position.

    The add() function takes one mandatory parameter which is the container widget to be added, and the rest are optional parameters such as text (text to be displayed as tab title), image and compound.

    The insert() function requires a tab_id, which defines the location where it should be inserted. The tab_id can be either an index value or it can be string literal like “end”, which will append it to the end.

    import tkinter as tk
    from tkinter import ttk
    
    root = tk.Tk()
    nb = ttk.Notebook(root)# Frame 1 and 2
    frame1 = ttk.Frame(nb)
    frame2 = ttk.Frame(nb)
    
    label1 = ttk.Label(frame1, text ="This is Window One")
    label1.pack(pady =50, padx =20)
    label2 = ttk.Label(frame2, text ="This is Window Two")
    label2.pack(pady =50, padx =20)
    
    frame1.pack(fill= tk.BOTH, expand=True)
    frame2.pack(fill= tk.BOTH, expand=True)
    nb.add(frame1, text ="Window 1")
    nb.add(frame2, text ="Window 2")
    
    frame3 = ttk.Frame(nb)
    label3 = ttk.Label(frame3, text ="This is Window Three")
    label3.pack(pady =50, padx =20)
    frame3.pack(fill= tk.BOTH, expand=True)
    nb.insert("end", frame3, text ="Window 3")
    nb.pack(padx =5, pady =5, expand =True)
    
    root.mainloop()

    It will produce the following output −

    Notebook

    Treeview

    The Treeview widget is used to display items in a tabular or hierarchical manner. It has support for features like creating rows and columns for items, as well as allowing items to have children as well, leading to a hierarchical format.

    Syntax

    tree = ttk.Treeview(container,**options)

    Options

    Sr.No.Option & Description
    1columnsA list of column names
    2displaycolumnsA list of column identifiers (either symbolic or integer indices) specifying which data columns are displayed and the order in which they appear, or the string “#all”.
    3heightThe number of rows visible.
    4paddingSpecifies the internal padding for the widget. Can be either an integer or a list of 4 values.
    5selectmodeOne of “extended”, “browse” or “none”. If set to “extended” (default), multiple items can be selected. If “browse”, only a single item can be selected at a time. If “none”, the selection cannot be changed by the user.
    6showA list containing zero or more of the following values, specifying which elements of the tree to display. The default is “tree headings”, i.e., show all elements.

    Example

    In this example we will create a simple Treeview ttk Widget and fill in some data into it. We have some data already stored in a list which will be reading and adding to the Treeview widget in our read_data() function.

    We first need to define a list/tuple of column names. We have left out the column “Name” because there already exists a (default) column with a blank name.

    We then assign that list/tuple to the columns option in Treeview, followed by defining the “headings”, where the column is the actual column, whereas the heading is just the title of the column that appears when the widget is displayed. We give each a column a name. “#0” is the name of the default column.

    The tree.insert() function has the following parameters −

    • Parent − which is left as an empty string if there is none.
    • Position − where we want to add the new item. To append, use tk.END
    • Iid − which is the item ID used to later track the item in question.
    • Text − to which we will assign the first value in the list (the name).

    Value we will pass the the other 2 values we obtained from the list.

    The Complete Code

    import tkinter as tk
    import tkinter.ttk as ttk
    from tkinter import simpledialog
    
    root = tk.Tk()
    data =[["Bobby",26,20000],["Harrish",31,23000],["Jaya",18,19000],["Mark",22,20500],]
    index=0defread_data():for index, line inenumerate(data):
          tree.insert('', tk.END, iid = index,
             text = line[0], values = line[1:])
    columns =("age","salary")
    
    tree= ttk.Treeview(root, columns=columns ,height =20)
    tree.pack(padx =5, pady =5)
    
    tree.heading('#0', text='Name')
    tree.heading('age', text='Age')
    tree.heading('salary', text='Salary')
    
    read_data()
    root.mainloop()

    It will produce the following output −

    Treeview

    Sizegrip

    The Sizegrip widget is basically a small arrow-like grip that is typically placed at the bottom-right corner of the screen. Dragging the Sizegrip across the screen also resizes the container to which it is attached to.

    Syntax

    sizegrip = ttk.Sizegrip(parent,**options)

    Example

    import tkinter as tk
    import tkinter.ttk as ttk
    
    root = tk.Tk()
    root.geometry("100x100")
    
    frame = ttk.Frame(root)
    label = ttk.Label(root, text ="Hello World")
    label.pack(padx =5, pady =5)
    sizegrip = ttk.Sizegrip(frame)
    sizegrip.pack(expand =True, fill = tk.BOTH, anchor = tk.SE)
    frame.pack(padx =10, pady =10, expand =True, fill = tk.BOTH)
    
    root.mainloop()

    It will produce the following output −

    Sizegrip

    Separator

    The ttk Separator widget is a very simple widget, that has just one purpose and that is to help “separate” widgets into groups/partitions by drawing a line between them. We can change the orientation of this line (separator) to either horizontal or vertical, and change its length/height.

    Syntax

    separator = ttk.Separator(parent,**options)

    The “orient”, which can either be tk.VERTICAL or tk.HORIZTONAL, for a vertical and horizontal separator respectively.

    Example

    Here we have created two Label widgets, and then created a Horizontal Separator between them.

    import tkinter as tk
    import tkinter.ttk as ttk
    
    root = tk.Tk()
    root.geometry("200x150")
    
    frame = ttk.Frame(root)
    
    label = ttk.Label(frame, text ="Hello World")
    label.pack(padx =5)
    
    separator = ttk.Separator(frame,orient= tk.HORIZONTAL)
    separator.pack(expand =True, fill = tk.X)
    
    label = ttk.Label(frame, text ="Welcome To TutorialsPoint")
    label.pack(padx =5)
    
    frame.pack(padx =10, pady =50, expand =True, fill = tk.BOTH)
    
    root.mainloop()

    It will produce the following output −

    Separator
  • Python – XML Processing

    XML is a portable, open-source language that allows programmers to develop applications that can be read by other applications, regardless of operating system and/or developmental language.

    What is XML?

    The Extensible Markup Language (XML) is a markup language much like HTML or SGML. This is recommended by the World Wide Web Consortium and available as an open standard.

    XML is extremely useful for keeping track of small to medium amounts of data without requiring an SQL- based backbone.

    XML Parser Architectures and APIs.

    The Python standard library provides a minimal but useful set of interfaces to work with XML. All the submodules for XML processing are available in the xml package.

    • xml.etree.ElementTree − the ElementTree API, a simple and lightweight XML processor
    • xml.dom − the DOM API definition.
    • xml.dom.minidom − a minimal DOM implementation.
    • xml.dom.pulldom − support for building partial DOM trees.
    • xml.sax − SAX2 base classes and convenience functions.
    • xml.parsers.expat − the Expat parser binding.

    The two most basic and broadly used APIs to XML data are the SAX and DOM interfaces.

    • Simple API for XML (SAX) − Here, you register callbacks for events of interest and then let the parser proceed through the document. This is useful when your documents are large or you have memory limitations, it parses the file as it reads it from the disk and the entire file is never stored in the memory.
    • Document Object Model (DOM) − This is a World Wide Web Consortium recommendation wherein the entire file is read into the memory and stored in a hierarchical (tree-based) form to represent all the features of an XML document.

    SAX obviously cannot process information as fast as DOM, when working with large files. On the other hand, using DOM exclusively can really kill your resources, especially if used on many small files.

    SAX is read-only, while DOM allows changes to the XML file. Since these two different APIs literally complement each other, there is no reason why you cannot use them both for large projects.

    For all our XML code examples, let us use a simple XML file movies.xml as an input −

    <collection shelf="New Arrivals"><movie title="Enemy Behind"><type>War, Thriller</type><format>DVD</format><year>2003</year><rating>PG</rating><stars>10</stars><description>Talk about a US-Japan war</description></movie><movie title="Transformers"><type>Anime, Science Fiction</type><format>DVD</format><year>1989</year><rating>R</rating><stars>8</stars><description>A schientific fiction</description></movie><movie title="Trigun"><type>Anime, Action</type><format>DVD</format><episodes>4</episodes><rating>PG</rating><stars>10</stars><description>Vash the Stampede!</description></movie><movie title="Ishtar"><type>Comedy</type><format>VHS</format><rating>PG</rating><stars>2</stars><description>Viewable boredom</description></movie></collection>

    Parsing XML with SAX APIs

    SAX is a standard interface for event-driven XML parsing. Parsing XML with SAX generally requires you to create your own ContentHandler by subclassing xml.sax.ContentHandler.

    Your ContentHandler handles the particular tags and attributes of your flavor(s) of XML. A ContentHandler object provides methods to handle various parsing events. Its owning parser calls ContentHandler methods as it parses the XML file.

    The methods startDocument and endDocument are called at the start and the end of the XML file. The method characters(text) is passed the character data of the XML file via the parameter text.

    The ContentHandler is called at the start and end of each element. If the parser is not in namespace mode, the methods startElement(tag, attributes) andendElement(tag) are called; otherwise, the corresponding methodsstartElementNS and endElementNS are called. Here, tag is the element tag, and attributes is an Attributes object.

    Here are other important methods to understand before proceeding −

    The make_parser Method

    The following method creates a new parser object and returns it. The parser object created will be of the first parser type, the system finds.

    xml.sax.make_parser([parser_list])

    Here is the detail of the parameters −

    • parser_list − The optional argument consisting of a list of parsers to use, which must all implement the make_parser method.

    The parse Method

    The following method creates a SAX parser and uses it to parse a document.

    xml.sax.parse( xmlfile, contenthandler[, errorhandler])

    Here are the details of the parameters −

    • xmlfile − This is the name of the XML file to read from.
    • contenthandler − This must be a ContentHandler object.
    • errorhandler − If specified, errorhandler must be a SAX ErrorHandler object.

    The parseString Method

    There is one more method to create a SAX parser and to parse the specifiedXML string.

    xml.sax.parseString(xmlstring, contenthandler[, errorhandler])

    Here are the details of the parameters −

    • xmlstring − This is the name of the XML string to read from.
    • contenthandler − This must be a ContentHandler object.
    • errorhandler − If specified, errorhandler must be a SAX ErrorHandler object.

    Example

    import xml.sax
    classMovieHandler( xml.sax.ContentHandler ):def__init__(self):
          self.CurrentData =""
          self.type=""
          self.format=""
          self.year =""
          self.rating =""
          self.stars =""
          self.description =""# Call when an element startsdefstartElement(self, tag, attributes):
          self.CurrentData = tag
          if tag =="movie":print("*****Movie*****")
             title = attributes["title"]print("Title:", title)# Call when an elements endsdefendElement(self, tag):if self.CurrentData =="type":print("Type:", self.type)elif self.CurrentData =="format":print("Format:", self.format)elif self.CurrentData =="year":print("Year:", self.year)elif self.CurrentData =="rating":print("Rating:", self.rating)elif self.CurrentData =="stars":print("Stars:", self.stars)elif self.CurrentData =="description":print("Description:", self.description)
          self.CurrentData =""# Call when a character is readdefcharacters(self, content):if self.CurrentData =="type":
             self.type= content
          elif self.CurrentData =="format":
             self.format= content
          elif self.CurrentData =="year":
             self.year = content
          elif self.CurrentData =="rating":
             self.rating = content
          elif self.CurrentData =="stars":
             self.stars = content
          elif self.CurrentData =="description":
             self.description = content
    
    if( __name__ =="__main__"):# create an XMLReader
       parser = xml.sax.make_parser()# turn off namepsaces
       parser.setFeature(xml.sax.handler.feature_namespaces,0)# override the default ContextHandler
       Handler = MovieHandler()
       parser.setContentHandler( Handler )
       
       parser.parse("movies.xml")

    This would produce the following result −

    *****Movie*****
    Title: Enemy Behind
    Type: War, Thriller
    Format: DVD
    Year: 2003
    Rating: PG
    Stars: 10
    Description: Talk about a US-Japan war
    *****Movie*****
    Title: Transformers
    Type: Anime, Science Fiction
    Format: DVD
    Year: 1989
    Rating: R
    Stars: 8
    Description: A schientific fiction
    *****Movie*****
    Title: Trigun
    Type: Anime, Action
    Format: DVD
    Rating: PG
    Stars: 10
    Description: Vash the Stampede!
    *****Movie*****
    Title: Ishtar
    Type: Comedy
    Format: VHS
    Rating: PG
    Stars: 2
    Description: Viewable boredom
    

    For a complete detail on SAX API documentation, please refer to standard Python SAX APIs.

    Parsing XML with DOM APIs

    The Document Object Model (“DOM”) is a cross-language API from the World Wide Web Consortium (W3C) for accessing and modifying the XML documents.

    The DOM is extremely useful for random-access applications. SAX only allows you a view of one bit of the document at a time. If you are looking at one SAX element, you have no access to another.

    Here is the easiest way to load an XML document quickly and to create a minidom object using the xml.dom module. The minidom object provides a simple parser method that quickly creates a DOM tree from the XML file.

    The sample phrase calls the parse( file [,parser] ) function of the minidom object to parse the XML file, designated by file into a DOM tree object.

    from xml.dom.minidom import parse
    import xml.dom.minidom
    
    # Open XML document using minidom parser
    DOMTree = xml.dom.minidom.parse("movies.xml")
    collection = DOMTree.documentElement
    if collection.hasAttribute("shelf"):print("Root element : %s"% collection.getAttribute("shelf"))# Get all the movies in the collection
    movies = collection.getElementsByTagName("movie")# Print detail of each movie.for movie in movies:print("*****Movie*****")if movie.hasAttribute("title"):print("Title: %s"% movie.getAttribute("title"))type= movie.getElementsByTagName('type')[0]print("Type: %s"%type.childNodes[0].data)format= movie.getElementsByTagName('format')[0]print("Format: %s"%format.childNodes[0].data)
       rating = movie.getElementsByTagName('rating')[0]print("Rating: %s"% rating.childNodes[0].data)
       description = movie.getElementsByTagName('description')[0]print("Description: %s"% description.childNodes[0].data)

    This would produce the following output −

    Root element : New Arrivals
    *****Movie*****
    Title: Enemy Behind
    Type: War, Thriller
    Format: DVD
    Rating: PG
    Description: Talk about a US-Japan war
    *****Movie*****
    Title: Transformers
    Type: Anime, Science Fiction
    Format: DVD
    Rating: R
    Description: A schientific fiction
    *****Movie*****
    Title: Trigun
    Type: Anime, Action
    Format: DVD
    Rating: PG
    Description: Vash the Stampede!
    *****Movie*****
    Title: Ishtar
    Type: Comedy
    Format: VHS
    Rating: PG
    Description: Viewable boredom
    

    For a complete detail on DOM API documentation, please refer to standard Python DOM APIs.

    ElementTree XML API

    The xml package has an ElementTree module. This is a simple and lightweight XML processor API.

    XML is a tree-like hierarchical data format. The ‘ElementTree’ in this module treats the whole XML document as a tree. The ‘Element’ class represents a single node in this tree. Reading and writing operations on XML files are done on the ElementTree level. Interactions with a single XML element and its sub-elements are done on the Element level.

    Create an XML File

    The tree is a hierarchical structure of elements starting with root followed by other elements. Each element is created by using the Element() function of this module.

    import xml.etree.ElementTree as et
    e=et.Element('name')

    Each element is characterized by a tag and attrib attribute which is a dict object. For tree’s starting element, attrib is an empty dictionary.

    >>> root=xml.Element('employees')>>> root.tag
    'employees'>>> root.attrib
    {}

    You may now set up one or more child elements to be added under the root element. Each child may have one or more sub elements. Add them using the SubElement() function and define its text attribute.

    child=xml.Element("employee")
    nm = xml.SubElement(child,"name")
    nm.text = student.get('name')
    age = xml.SubElement(child,"salary")
    age.text =str(student.get('salary'))

    Each child is added to root by append() function as −

    root.append(child)

    After adding required number of child elements, construct a tree object by elementTree() function −

    tree = et.ElementTree(root)

    The entire tree structure is written to a binary file by tree object’s write() function −

    f=open('employees.xml',"wb")
    tree.write(f)

    Example

    In this example, a tree is constructed out of a list of dictionary items. Each dictionary item holds key-value pairs describing a student data structure. The tree so constructed is written to ‘myfile.xml’

    import xml.etree.ElementTree as et
    employees=[{'name':'aaa','age':21,'sal':5000},{'name':xyz,'age':22,'sal':6000}]
    root = et.Element("employees")for employee in employees:
       child=xml.Element("employee")
       root.append(child)
       nm = xml.SubElement(child,"name")
       nm.text = student.get('name')
       age = xml.SubElement(child,"age")
       age.text =str(student.get('age'))
       sal=xml.SubElement(child,"sal")
       sal.text=str(student.get('sal'))
    tree = et.ElementTree(root)withopen('employees.xml',"wb")as fh:
       tree.write(fh)

    The ‘myfile.xml’ is stored in current working directory.

    <employees><employee><name>aaa</name><age>21</age><sal>5000</sal></employee><employee><name>xyz</name><age>22</age><sal>60</sal></employee></employee>

    Parse an XML File

    Let us now read back the ‘myfile.xml’ created in above example. For this purpose, following functions in ElementTree module will be used −

    ElementTree() − This function is overloaded to read the hierarchical structure of elements to a tree objects.

    tree = et.ElementTree(file='students.xml')

    getroot() − This function returns root element of the tree.

    root = tree.getroot()

    You can obtain the list of sub-elements one level below of an element.

    children =list(root)

    In the following example, elements and sub-elements of the ‘myfile.xml’ are parsed into a list of dictionary items.

    Example

    import xml.etree.ElementTree as et
    tree = et.ElementTree(file='employees.xml')
    root = tree.getroot()
    employees=[]
       children =list(root)for child in children:
       employee={}
       pairs =list(child)for pair in pairs:
          employee[pair.tag]=pair.text
       employees.append(employee)print(employees)

    It will produce the following output −

    [{'name': 'aaa', 'age': '21', 'sal': '5000'}, {'name': 'xyz', 'age':'22', 'sal': '6000'}]
    

    Modify an XML file

    We shall use iter() function of Element. It creates a tree iterator for given tag with the current element as the root. The iterator iterates over this element and all elements below it, in document (depth first) order.

    Let us build iterator for all ‘marks’ subelements and increment text of each sal tag by 100.

    import xml.etree.ElementTree as et
    tree = et.ElementTree(file='students.xml')
    root = tree.getroot()for x in root.iter('sal'):
       s=int(x.text)
       s=s+100
       x.text=str(s)withopen("employees.xml","wb")as fh:
       tree.write(fh)

    Our ’employees.xml’ will now be modified accordingly. We can also use set() to update value of a certain key.

    x.set(marks, str(mark))
  • Python – CGI Programming

     The Common Gateway Interface, or CGI, is a set of standards that define how information is exchanged between the web server and a custom script. The CGI specs are currently maintained by the NCSA.

    What is CGI?

    • The Common Gateway Interface, or CGI, is a standard for external gateway programs to interface with information servers such as HTTP servers.
    • The current version is CGI/1.1 and CGI/1.2 is under progress.

    Web Browsing

    To understand the concept of CGI, let us see what happens when we click a hyper link to browse a particular web page or URL.

    • Your browser contacts the HTTP web server and demands for the URL, i.e., filename.
    • Web Server parses the URL and looks for the filename. If it finds that file then sends it back to the browser, otherwise sends an error message indicating that you requested a wrong file.
    • Web browser takes response from web server and displays either the received file or error message.

    However, it is possible to set up the HTTP server so that whenever a file in a certain directory is requested that file is not sent back; instead it is executed as a program, and whatever that program outputs is sent back for your browser to display. This function is called the Common Gateway Interface or CGI and the programs are called CGI scripts. These CGI programs can be a Python Script, PERL Script, Shell Script, C or C++ program, etc.

    CGI Architecture Diagram

    Cgi Architecture Diagram

    Web Server Support and Configuration

    Before you proceed with CGI Programming, make sure that your Web Server supports CGI and it is configured to handle CGI Programs. All the CGI Programs to be executed by the HTTP server are kept in a pre-configured directory. This directory is called CGI Directory and by convention it is named as /var/www/cgi-bin. By convention, CGI files have extension as. cgi, but you can keep your files with python extension .py as well.

    By default, the Linux server is configured to run only the scripts in the cgi-bin directory in /var/www. If you want to specify any other directory to run your CGI scripts, comment the following lines in the httpd.conf file −

    <Directory "/var/www/cgi-bin">
       AllowOverride None
       Options ExecCGI
       Order allow,deny
       Allow fromall</Directory><Directory "/var/www/cgi-bin">
    Options All
    </Directory>

    The following line should also be added for apache server to treat .py file as cgi script.

    AddHandler cgi-script .py
    

    Here, we assume that you have Web Server up and running successfully and you are able to run any other CGI program like Perl or Shell, etc.

    First CGI Program

    Here is a simple link, which is linked to a CGI script called hello.py. This file is kept in /var/www/cgi-bin directory and it has following content. Before running your CGI program, make sure you have change mode of file using chmod 755 hello.py UNIX command to make file executable.

    print("Content-type:text/html\r\n\r\n")print('<html>')print('<head>')print('<title>Hello Word - First CGI Program</title>')print('</head>')print('<body>')print('<h2>Hello Word! This is my first CGI program</h2>')print('</body>')print('</html>')

    Note − First line in the script must be the path to Python executable. It appears as a comment in Python program, but it is called shebang line.

    In Linux, it should be #!/usr/bin/python3.

    In Windows, it should be #!c:/python311/python.exd.

    Enter the following URL in your browser −

    http://localhost/cgi-bin/hello.py
    
    Hello Word! This is my first CGI program
    

    This hello.py script is a simple Python script, which writes its output on STDOUT file, i.e., screen. There is one important and extra feature available which is first line to be printed Content-type:text/html\r\n\r\n. This line is sent back to the browser and it specifies the content type to be displayed on the browser screen.

    By now you must have understood basic concept of CGI and you can write many complicated CGI programs using Python. This script can interact with any other external system also to exchange information such as RDBMS.

    HTTP Header

    The line Content-type:text/html\r\n\r\n is part of HTTP header which is sent to the browser to understand the content. All the HTTP header will be in the following form −

    HTTP Field Name: Field Content
    
    For Example
    Content-type: text/html\r\n\r\n
    

    There are few other important HTTP headers, which you will use frequently in your CGI Programming.

    Sr.No.Header & Description
    1Content-type:A MIME string defining the format of the file being returned. Example is Content-type:text/html
    2Expires: DateThe date the information becomes invalid. It is used by the browser to decide when a page needs to be refreshed. A valid date string is in the format 01 Jan 1998 12:00:00 GMT.
    3Location: URLThe URL that is returned instead of the URL requested. You can use this field to redirect a request to any file.
    4Last-modified: DateThe date of last modification of the resource.
    5Content-length: NThe length, in bytes, of the data being returned. The browser uses this value to report the estimated download time for a file.
    6Set-Cookie: StringSet the cookie passed through the string

    CGI Environment Variables

    All the CGI programs have access to the following environment variables. These variables play an important role while writing any CGI program.

    Sr.No.Variable Name & Description
    1CONTENT_TYPEThe data type of the content. Used when the client is sending attached content to the server. For example, file upload.
    2CONTENT_LENGTHThe length of the query information. It is available only for POST requests.
    3HTTP_COOKIEReturns the set cookies in the form of key & value pair.
    4HTTP_USER_AGENTThe User-Agent request-header field contains information about the user agent originating the request. It is name of the web browser.
    5PATH_INFOThe path for the CGI script.
    6QUERY_STRINGThe URL-encoded information that is sent with GET method request.
    7REMOTE_ADDRThe IP address of the remote host making the request. This is useful logging or for authentication.
    8REMOTE_HOSTThe fully qualified name of the host making the request. If this information is not available, then REMOTE_ADDR can be used to get IR address.
    9REQUEST_METHODThe method used to make the request. The most common methods are GET and POST.
    10SCRIPT_FILENAMEThe full path to the CGI script.
    11SCRIPT_NAMEThe name of the CGI script.
    12SERVER_NAMEThe server’s hostname or IP Address
    13SERVER_SOFTWAREThe name and version of the software the server is running.

    Here is small CGI program to list out all the CGI variables. Click this link to see the result Get Environment

    import os
    
    print("Content-type: text/html\r\n\r\n");print("<font size=+1>Environment</font><\br>");for param in os.environ.keys():print("<b>%20s</b>: %s<\br>"%(param, os.environ[param]))

    GET and POST Methods

    You must have come across many situations when you need to pass some information from your browser to web server and ultimately to your CGI Program. Most frequently, browser uses two methods two pass this information to web server. These methods are GET Method and POST Method.

    Passing Information using GET method

    The GET method sends the encoded user information appended to the page request. The page and the encoded information are separated by the ? character as follows −

    http://www.test.com/cgi-bin/hello.py?key1=value1&key2=value2
    
    • The GET method is the default method to pass information from the browser to the web server and it produces a long string that appears in your browser’s Location:box.
    • Never use GET method if you have password or other sensitive information to pass to the server.
    • The GET method has size limtation: only 1024 characters can be sent in a request string.
    • The GET method sends information using QUERY_STRING header and will be accessible in your CGI Program through QUERY_STRING environment variable.

    You can pass information by simply concatenating key and value pairs along with any URL or you can use HTML <FORM> tags to pass information using GET method.

    Simple URL Example:Get Method

    Here is a simple URL, which passes two values to hello_get.py program using GET method.

    /cgi-bin/hello_get.py?first_name=Malhar&last_name=Lathkar
    

    Given below is the hello_get.py script to handle the input given by web browser. We are going to use the cgi module, which makes it very easy to access the passed information −

    # Import modules for CGI handlingimport cgi, cgitb
    
    # Create instance of FieldStorage
    form = cgi.FieldStorage()# Get data from fields
    first_name = form.getvalue('first_name')
    last_name = form.getvalue('last_name')print("Content-type:text/html")print()print("<html>")print('<head>')print("<title>Hello - Second CGI Program</title>")print('</head>')print('<body>')print("<h2>Hello %s %s</h2>"%(first_name, last_name))print('</body>')print('</html>')

    This would generate the following result −

    Hello Malhar Lathkar
    

    Simple FORM Example:GET Method

    This example passes two values using HTML FORM and submit button. We use same CGI script hello_get.py to handle this input.

    <form action ="/cgi-bin/hello_get.py" method ="get">
       First Name:<inputtype="text" name ="first_name"><br />
    
       Last Name:<inputtype="text" name ="last_name"/><inputtype="submit" value ="Submit"/></form>

    Here is the actual output of the above form, you enter First and Last Name and then click submit button to see the result.First Name: 
    Last Name:  

    Passing Information Using POST Method

    A generally more reliable method of passing information to a CGI program is the POST method. This packages the information in exactly the same way as GET methods, but instead of sending it as a text string after a ? in the URL it sends it as a separate message. This message comes into the CGI script in the form of the standard input.

    Below is same hello_get.py script which handles GET as well as POST method.

    # Import modules for CGI handling import cgi, cgitb 
    
    # Create instance of FieldStorage 
    form = cgi.FieldStorage()# Get data from fields
    first_name = form.getvalue('first_name')
    last_name  = form.getvalue('last_name')print"Content-type:text/html\r\n\r\n"print"<html>"print"<head>"print"<title>Hello - Second CGI Program</title>"print"</head>"print"<body>"print"<h2>Hello %s %s</h2>"%(first_name, last_name)print"</body>"print"</html>"

    Let us take again same example as above which passes two values using HTML FORM and submit button. We use same CGI script hello_get.py to handle this input.

    <form action ="/cgi-bin/hello_get.py" method ="post">
    First Name:<inputtype="text" name ="first_name"><br />
    Last Name:<inputtype="text" name ="last_name"/><inputtype="submit" value ="Submit"/></form>

    Here is the actual output of the above form. You enter First and Last Name and then click submit button to see the result.First Name: 
    Last Name:  

    Passing Checkbox Data to CGI Program

    Checkboxes are used when more than one option is required to be selected.

    Here is example HTML code for a form with two checkboxes −

    <form action ="/cgi-bin/checkbox.cgi" method ="POST" target ="_blank"><inputtype="checkbox" name ="maths" value ="on"/> Maths
       <inputtype="checkbox" name ="physics" value ="on"/> Physics
       <inputtype="submit" value ="Select Subject"/></form>

    The result of this code is the following form − Maths  Physics 

    Below is checkbox.cgi script to handle input given by web browser for checkbox button.

    # Import modules for CGI handling import cgi, cgitb 
    
    # Create instance of FieldStorage 
    form = cgi.FieldStorage()# Get data from fieldsif form.getvalue('maths'):
       math_flag ="ON"else:
       math_flag ="OFF"if form.getvalue('physics'):
       physics_flag ="ON"else:
       physics_flag ="OFF"print"Content-type:text/html\r\n\r\n"print"<html>"print"<head>"print"<title>Checkbox - Third CGI Program</title>"print"</head>"print"<body>"print"<h2> CheckBox Maths is : %s</h2>"% math_flag
    print"<h2> CheckBox Physics is : %s</h2>"% physics_flag
    print"</body>"print"</html>"

    Passing Radio Button Data to CGI Program

    Radio Buttons are used when only one option is required to be selected.

    Here is example HTML code for a form with two radio buttons −

    <form action ="/cgi-bin/radiobutton.py" method ="post" target ="_blank"><inputtype="radio" name ="subject" value ="maths"/> Maths
       <inputtype="radio" name ="subject" value ="physics"/> Physics
       <inputtype="submit" value ="Select Subject"/></form>

    The result of this code is the following form − Maths  Physics 

    Below is radiobutton.py script to handle input given by web browser for radio button −

    # Import modules for CGI handling import cgi, cgitb 
    
    # Create instance of FieldStorage 
    form = cgi.FieldStorage()# Get data from fieldsif form.getvalue('subject'):
       subject = form.getvalue('subject')else:
       subject ="Not set"print"Content-type:text/html\r\n\r\n"print"<html>"print"<head>"print"<title>Radio - Fourth CGI Program</title>"print"</head>"print"<body>"print"<h2> Selected Subject is %s</h2>"% subject
    print"</body>"print"</html>"

    Passing Text Area Data to CGI Program

    TEXTAREA element is used when multiline text has to be passed to the CGI Program.

    Here is example HTML code for a form with a TEXTAREA box −

    <form action ="/cgi-bin/textarea.py" method ="post" target ="_blank"><textarea name ="textcontent" cols ="40" rows ="4">
          Type your text here...</textarea><inputtype="submit" value ="Submit"/></form>

    The result of this code is the following form −

    Below is textarea.cgi script to handle input given by web browser −

    # Import modules for CGI handling import cgi, cgitb 
    
    # Create instance of FieldStorage 
    form = cgi.FieldStorage()# Get data from fieldsif form.getvalue('textcontent'):
       text_content = form.getvalue('textcontent')else:
       text_content ="Not entered"print"Content-type:text/html\r\n\r\n"print"<html>"print"<head>";print"<title>Text Area - Fifth CGI Program</title>"print"</head>"print"<body>"print"<h2> Entered Text Content is %s</h2>"% text_content
    print"</body>"

    Passing Drop Down Box Data to CGI Program

    Drop Down Box is used when we have many options available but only one or two will be selected.

    Here is example HTML code for a form with one drop down box −

    <form action ="/cgi-bin/dropdown.py" method ="post" target ="_blank"><select name ="dropdown"><option value ="Maths" selected>Maths</option><option value ="Physics">Physics</option></select><inputtype="submit" value ="Submit"/></form>

    The result of this code is the following form − Maths Physics  

    Below is dropdown.py script to handle input given by web browser.

    # Import modules for CGI handling import cgi, cgitb 
    
    # Create instance of FieldStorage 
    form = cgi.FieldStorage()# Get data from fieldsif form.getvalue('dropdown'):
       subject = form.getvalue('dropdown')else:
       subject ="Not entered"print"Content-type:text/html\r\n\r\n"print"<html>"print"<head>"print"<title>Dropdown Box - Sixth CGI Program</title>"print"</head>"print"<body>"print"<h2> Selected Subject is %s</h2>"% subject
    print"</body>"print"</html>"

    Using Cookies in CGI

    HTTP protocol is a stateless protocol. For a commercial website, it is required to maintain session information among different pages. For example, one user registration ends after completing many pages. How to maintain user’s session information across all the web pages?

    In many situations, using cookies is the most efficient method of remembering and tracking preferences, purchases, commissions, and other information required for better visitor experience or site statistics.

    How It Works?

    Your server sends some data to the visitor’s browser in the form of a cookie. The browser may accept the cookie. If it does, it is stored as a plain text record on the visitor’s hard drive. Now, when the visitor arrives at another page on your site, the cookie is available for retrieval. Once retrieved, your server knows/remembers what was stored.

    Cookies are a plain text data record of 5 variable-length fields −

    • Expires − The date the cookie will expire. If this is blank, the cookie will expire when the visitor quits the browser.
    • Domain − The domain name of your site.
    • Path − The path to the directory or web page that sets the cookie. This may be blank if you want to retrieve the cookie from any directory or page.
    • Secure − If this field contains the word “secure”, then the cookie may only be retrieved with a secure server. If this field is blank, no such restriction exists.
    • Name = Value − Cookies are set and retrieved in the form of key and value pairs.

    Setting up Cookies

    It is very easy to send cookies to browser. These cookies are sent along with HTTP Header before to Content-type field. Assuming you want to set UserID and Password as cookies. Setting the cookies is done as follows −

    print"Set-Cookie:UserID = XYZ;\r\n"print"Set-Cookie:Password = XYZ123;\r\n"print"Set-Cookie:Expires = Tuesday, 31-Dec-2007 23:12:40 GMT;\r\n"print"Set-Cookie:Domain = www.tutorialspoint.com;\r\n"print"Set-Cookie:Path = /perl;\n"print"Content-type:text/html\r\n\r\n"...........Rest of the HTML Content....

    From this example, you must have understood how to set cookies. We use Set-Cookie HTTP header to set cookies.

    It is optional to set cookies attributes like Expires, Domain, and Path. It is notable that cookies are set before sending magic line “Content-type:text/html\r\n\r\n.

    Retrieving Cookies

    It is very easy to retrieve all the set cookies. Cookies are stored in CGI environment variable HTTP_COOKIE and they will have following form −

    key1 = value1;key2 = value2;key3 = value3....
    

    Here is an example of how to retrieve cookies.

    # Import modules for CGI handling from os import environ
    import cgi, cgitb
    
    if environ.has_key('HTTP_COOKIE'):for cookie inmap(strip, split(environ['HTTP_COOKIE'],';')):(key, value )= split(cookie,'=');if key =="UserID":
             user_id = value
    
          if key =="Password":
             password = value
    
    print"User ID  = %s"% user_id
    print"Password = %s"% password
    

    This produces the following result for the cookies set by above script −

    User ID = XYZ
    Password = XYZ123
    

    File Upload Example

    To upload a file, the HTML form must have the enctype attribute set to multipart/form-data. The input tag with the file type creates a “Browse” button.

    <html><body><form enctype ="multipart/form-data" action ="save_file.py" method ="post"><p>File:<inputtype="file" name ="filename"/></p><p><inputtype="submit" value ="Upload"/></p></form></body></html>

    The result of this code is the following form −

    File: 

    Above example has been disabled intentionally to save people uploading file on our server, but you can try above code with your server.

    Here is the script save_file.py to handle file upload −

    import cgi, os
    import cgitb; cgitb.enable()
    
    form = cgi.FieldStorage()# Get filename here.
    fileitem = form['filename']# Test if the file was uploadedif fileitem.filename:# strip leading path from file name to avoid # directory traversal attacks
       fn = os.path.basename(fileitem.filename)open('/tmp/'+ fn,'wb').write(fileitem.file.read())
    
       message ='The file "'+ fn +'" was uploaded successfully'else:
       message ='No file was uploaded'print"""\
    Content-Type: text/html\n
    <html>
       <body>
          <p>%s</p>
       </body>
    </html>
    """%(message,)

    If you run the above script on Unix/Linux, then you need to take care of replacing file separator as follows, otherwise on your windows machine above open() statement should work fine.

    fn = os.path.basename(fileitem.filename.replace("\\", "/" ))
    

    How To Raise a “File Download” Dialog Box?

    Sometimes, it is desired that you want to give option where a user can click a link and it will pop up a “File Download” dialogue box to the user instead of displaying actual content. This is very easy and can be achieved through HTTP header. This HTTP header is be different from the header mentioned in previous section.

    For example, if you want make a FileName file downloadable from a given link, then its syntax is as follows −

    # HTTP Headerprint"Content-Type:application/octet-stream; name = \"FileName\"\r\n";print"Content-Disposition: attachment; filename = \"FileName\"\r\n\n";# Actual File Content will go here.
    fo =open("foo.txt","rb")str= fo.read();printstr# Close opend file
    fo.close()
    
    
  • Python – Data Compression

    Python’s standard library has a rich collection of modules for data compression and archiving. One can select whichever is suitable for his job.

    There are following modules related to data compression −

    Sr.No.Module & Description
    1zlibCompression compatible with gzip.
    2gzipSupport for gzip files.
    3bz2Support for bz2 compression.
    4lzmaCompression using the LZMA algorithm.
    5zipfileWork with ZIP archives.
    6tarfilevRead and write tar archive files.
  • Python – Performance Measurement

    A given problem may be solved by more than one alternative algorithms. Hence, we need to optimize the performance of the solution. Python’s timeit module is a useful tool to measure the performance of a Python application.

    The timit() function in this module measures execution time of your Python code.

    Syntax

    timeit.timeit(stmt, setup, timer, number)

    Parameters

    • stmt − code snippet for measurement of performance.
    • setup − setup details arguments to be passed or variables.
    • timer − uses default timer, so, it may be skipped.
    • number − the code will be executed this number of times. The default is 1000000.

    Example

    The following statement uses list comprehension to return a list of multiple of 2 for each number in the range upto 100.

    >>>[n*2for n inrange(100)][0,2,4,6,8,10,12,14,16,18,20,22,24,26,28,30,32,34,36,38,40,42,44,46,48,50,52,54,56,58,60,62,64,66,68,70,72,74,76,78,80,82,84,86,88,90,92,94,96,98,100,102,104,106,108,110,112,114,116,118,120,122,124,126,128,130,132,134,136,138,140,142,144,146,148,150,152,154,156,158,160,162,164,166,168,170,172,174,176,178,180,182,184,186,188,190,192,194,196,198]

    To measure the execution time of the above statement, we use the timeit() function as follows −

    >>>from timeit import timeit
    >>> timeit('[n*2 for n in range(100)]', number=10000)0.0862189000035869

    Compare the execution time with the process of appending the numbers using a for loop.

    >>> string ='''
    ... numbers=[]
    ... for n in range(100):
    ... numbers.append(n*2)
    ... '''>>> timeit(string, number=10000)0.1010853999905521

    The result shows that list comprehension is more efficient.

    The statement string can contain a Python function to which one or more arguments My be passed as setup code.

    We shall find and compare the execution time of a factorial function using a loop with that of its recursive version.

    The normal function using for loop is −

    deffact(x):
       fact =1for i inrange(1, x+1):
          fact*=i
       return fact
    

    Definition of recursive factorial.

    defrfact(x):if x==1:return1else:return x*fact(x-1)

    Test these functions to calculate factorial of 10.

    print("Using loop:",fact(10))print("Using Recursion",rfact(10))
    Result
    Using loop:3628800
    Using Recursion 3628800

    Now we shall find their respective execution time with timeit() function.

    import timeit
    
    setup1="""
    from __main__ import fact
    x = 10
    """
    
    setup2="""
    from __main__ import rfact
    x = 10
    """print("Performance of factorial function with loop")print(timeit.timeit(stmt ="fact(x)", setup=setup1, number=10000))print("Performance of factorial function with Recursion")print(timeit.timeit(stmt ="rfact(x)", setup=setup2, number=10000))

    Output

    Performance of factorial function with loop
    0.00330029999895487
    Performance of factorial function with Recursion
    0.006506800003990065
    

    The recursive function is slower than the function with loop.

    In this way, we can perform performance measurement of Python code.

  • Python – Output Formatting

    Output Formatting in Python

    Output formatting in Python is used to make your code more readable and your output more user-friendly. Whether you are displaying simple text strings, complex data structures, or creating reports, Python offers several ways for formatting output.

    These ways include using −

    • The string modulo operator (%)
    • The format() method
    • The f-strings (formatted string literals)
    • The template strings

    Additionally, Python’s “textwrap” and “pprint” modules offer advanced functionalities for wrapping text and pretty-printing data structures.

    Using String Modulo Operator (%)

    We can format output using the string modulo operator %. This operator is unique to strings and makes up for the pack of having functions from C’s printf() family. Format specification symbols like %d%c%f, and %s are used as placeholders in a string, similar to those in C.

    Following is a simple example −

    print("My name is %s and weight is %d kg!"%('Zara',21))

    It will produce the following output −

    My name is Zara and weight is 21 kg!
    

    Using the format() Method

    We can format output using the format() method, which was introduced in Python 3.0 and has been backported to Python 2.6 and 2.7.

    The format() method is part of the built-in string class and allows for complex variable substitutions and value formatting. It is considered a more elegant and flexible way to format strings compared to the string modulo operator.

    Syntax

    The general syntax of format() method is as follows −

    str.format(var1, var2,...)

    Return Value

    The method returns a formatted string.

    The string itself contains placeholders {} in which values of variables are successively inserted.

    Example

    name="Rajesh"
    age=23print("my name is {} and my age is {} years".format(name, age))

    It will produce the following output −

    my name is Rajesh and my age is 23 years
    

    You can use variables as keyword arguments to format() method and use the variable name as the placeholder in the string.

    print("my name is{name}and my age is{age}
    years".format(name="Rajesh", age=23))

    Using F-Strings

    F-strings, or formatted string literals, are a way to format strings in Python that is simple, fast, and easy to read. You create an f-string by adding an f before the opening quotation mark of a string.

    Inside the string, you can include placeholders for variables, which are enclosed in curly braces {}. The values of these variables will be inserted into the string at those places.

    Example

    In this example, the variables “name” and “age” are inserted into the string where their placeholders “{name}” and “{age}” are located. F-strings make it easy to include variable values in strings without having to use the format() method or string concatenation −

    name ='Rajesh'
    age =23
    
    fstring =f'My name is {name} and I am {age} years old'print(fstring)

    It will produce the following output −

    My name is Rajesh and I am 23 years old
    

    Format Conversion Rule in Python

    You can also specify C-style formatting symbols. The only change is using : instead of %. For example, instead of %s use {:s} and instead of %d use {:d} as shown below −

    name ="Rajesh"
    age =23print("my name is {:s} and my age is {:d} years".format(name, age))

    You will get the output as shown below −

    my name is Rajesh and my age is 23 years
    

    Template Strings

    The Template class in string module provides an alternative method to format the strings dynamically. One of the benefits of Template class is to be able to customize the formatting rules.

    A valid template string, or placeholder, consists of two parts: The $ symbol followed by a valid Python identifier.

    You need to create an object of Template class and use the template string as an argument to the constructor. Next, call the substitute() method of Template class. It puts the values provided as the parameters in place of template strings.

    Example

    from string import Template
    
    temp_str ="My name is $name and I am $age years old"
    tempobj = Template(temp_str)
    ret = tempobj.substitute(name='Rajesh', age=23)print(ret)

    It will produce the following output −

    My name is Rajesh and I am 23 years old
    

    The textwrap Module

    The wrap class in Python’s textwrap module contains functionality to format and wrap plain texts by adjusting the line breaks in the input paragraph. It helps in making the text wellformatted and beautiful.

    The textwrap module has the following convenience functions −

    textwrap.wrap(text, width=70)

    The textwrap.wrap() function wraps the single paragraph in text (a string) so every line is at most width characters long. Returns a list of output lines, without final newlines. Optional keyword arguments correspond to the instance attributes of TextWrapper. width defaults to 70.

    textwrap.fill(text, width=70)

    The textwrap.fill() function wraps the single paragraph in text, and returns a single string containing the wrapped paragraph.

    Both methods internally create an object of TextWrapper class and calling a single method on it. Since the instance is not reused, it will be more efficient for you to create your own TextWrapper object.

    Example

    import textwrap
    
    text ='''
    Python is a high-level, general-purpose programming language. Its design philosophy emphasizes code readability with the use of significant indentation via the off-side rule.
    
    Python is dynamically typed and garbage-collected. It supports multiple programming paradigms, including structured (particularly procedural), object-oriented and functional programming. It is often described as a "batteries included" language due to its comprehensive standard library.
    '''
    
    wrapper = textwrap.TextWrapper(width=40)
    wrapped = wrapper.wrap(text = text)# Print outputfor element in wrapped:print(element)

    It will produce the following output −

    Python is a high-level, general-purpose
    programming language. Its design
    philosophy emphasizes code readability
    with the use of significant indentation
    via the off-side rule. Python is
    dynamically typed and garbage-collected.
    It supports multiple programming
    paradigms, including structured
    (particularly procedural), objectoriented and functional programming. It
    is often described as a "batteries
    included" language due to its
    comprehensive standard library.
    

    Following attributes are defined for a TextWrapper object −

    • width − (default: 70) The maximum length of wrapped lines.
    • expand_tabs − (default: True) If true, then all tab characters in text will be expanded to spaces using the expandtabs() method of text.
    • tabsize − (default: 8) If expand_tabs is true, then all tab characters in text will be expanded to zero or more spaces, depending on the current column and the given tab size.
    • replace_whitespace − (default: True) If true, after tab expansion but before wrapping, the wrap() method will replace each whitespace character with a single space.
    • drop_whitespace − (default: True) If true, whitespace at the beginning and ending of every line (after wrapping but before indenting) is dropped. Whitespace at the beginning of the paragraph, however, is not dropped if non-whitespace follows it. If whitespace being dropped takes up an entire line, the whole line is dropped.
    • initial_indent − (default: ”) String that will be prepended to the first line of wrapped output.
    • subsequent_indent − (default: ”) String that will be prepended to all lines of wrapped output except the first.
    • fix_sentence_endings − (default: False) If true, TextWrapper attempts to detect sentence endings and ensure that sentences are always separated by exactly two spaces. This is generally desired for text in a monospaced font.
    • break_long_words − (default: True) If true, then words longer than width will be broken in order to ensure that no lines are longer than width. If it is false, long words will not be broken, and some lines may be longer than width.
    • break_on_hyphens − (default: True) If true, wrapping will occur preferably on whitespaces and right after hyphens in compound words, as it is customary in English. If false, only whitespaces will be considered as potentially good places for line breaks.

    The shorten() Function

    The shorten() function collapse and truncate the given text to fit in the given width. The text first has its whitespace collapsed. If it then fits in the *width*, it is returned as is. Otherwise, as many words as possible are joined and then the placeholder is appended −

    Example

    import textwrap
    
    python_desc ="""Python is a general-purpose interpreted, interactive, object-oriented, and high-level programming language. It was created by Guido van Rossum during 1985- 1990. Like Perl, Python source code is also available under the GNU General Public License (GPL). This tutorial gives enough understanding on Python programming language."""
    
    my_wrap = textwrap.TextWrapper(width =40)
    
    short_text = textwrap.shorten(text = python_desc, width=150)print('\n\n'+ my_wrap.fill(text = short_text))

    It will produce the following output −

    Python is a general-purpose interpreted,
    interactive, object-oriented,and high
    level programming language. It was 
    created by Guido van Rossum [...]
    

    The pprint Module

    The pprint module in Python’s standard library enables aesthetically good looking appearance of Python data structures. The name pprint stands for pretty printer. Any data structure that can be correctly parsed by Python interpreter is elegantly formatted.

    The formatted expression is kept in one line as far as possible, but breaks into multiple lines if the length exceeds the width parameter of formatting. One unique feature of pprint output is that the dictionaries are automatically sorted before the display representation is formatted.

    PrettyPrinter Class

    The pprint module contains definition of PrettyPrinter class. Its constructor takes following format −

    Syntax

    pprint.PrettyPrinter(indent, width, depth, stream, compact)

    Parameters

    • indent − defines indentation added on each recursive level. Default is 1.
    • width − by default is 80. Desired output is restricted by this value. If the length is greater than width, it is broken in multiple lines.
    • depth − controls number of levels to be printed.
    • stream − is by default std.out − the default output device. It can take any stream object such as file.
    • compact − id set to False by default. If true, only the data adjustable within width will be displayed.

    The PrettyPrinter class defines following methods −

    pprint() method

    The pprint() method prints the formatted representation of PrettyPrinter object.

    pformat() method

    The pformat() method returns the formatted representation of object, based on parameters to the constructor.

    Example

    The following example demonstrates a simple use of PrettyPrinter class −

    import pprint
    students={"Dilip":["English","Maths","Science"],"Raju":{"English":50,"Maths":60,"Science":70},"Kalpana":(50,60,70)}
    pp=pprint.PrettyPrinter()print("normal print output")print(students)print("----")print("pprint output")
    pp.pprint(students)

    The output shows normal as well as pretty print display −

    normal print output
    {'Dilip': ['English', 'Maths', 'Science'], 'Raju': {'English': 50, 'Maths': 60, 'Science': 70}, 'Kalpana': (50, 60, 70)}
    ----
    pprint output
    {'Dilip': ['English', 'Maths', 'Science'],
     'Kalpana': (50, 60, 70),
     'Raju': {'English': 50, 'Maths': 60, 'Science': 70}}
    

    The pprint module also defines convenience functions pprint() and pformat() corresponding to PrettyPrinter methods. The example below uses pprint() function.

    from pprint import pprint
    students={"Dilip":["English","Maths","Science"],"Raju":{"English":50,"Maths":60,"Science":70},"Kalpana":(50,60,70)}print("normal print output")print(students)print("----")print("pprint output")
    pprint (students)

    Example Using pformat() Method

    The next example uses pformat() method as well as pformat() function. To use pformat() method, PrettyPrinter object is first set up. In both cases, the formatted representation is displayed using normal print() function.

    import pprint
    students={"Dilip":["English","Maths","Science"],"Raju":{"English":50,"Maths":60,"Science":70},"Kalpana":(50,60,70)}print("using pformat method")
    pp=pprint.PrettyPrinter()
    string=pp.pformat(students)print(string)print('------')print("using pformat function")
    string=pprint.pformat(students)print(string)

    Here is the output of the above code −

    using pformat method
    {'Dilip': ['English', 'Maths', 'Science'],
     'Kalpana': (50, 60, 70),
     'Raju': {'English': 50, 'Maths': 60, 'Science': 70}}
    ------
    using pformat function
    {'Dilip': ['English', 'Maths', 'Science'],
     'Kalpana': (50, 60, 70),
     'Raju': {'English': 50, 'Maths': 60, 'Science': 70}}
    

    Pretty printer can also be used with custom classes. Inside the class __repr__() method is overridden. The __repr__() method is called when repr() function is used. It is the official string representation of Python object. When we use object as parameter to print() function it prints return value of repr() function.

    Example

    In this example, the __repr__() method returns the string representation of player object −

    import pprint
    classplayer:def__init__(self, name, formats=[], runs=[]):
          self.name=name
          self.formats=formats
          self.runs=runs
       def__repr__(self):
          dct={}
          dct[self.name]=dict(zip(self.formats,self.runs))return(repr(dct))
    
    l1=['Tests','ODI','T20']
    l2=[[140,45,39],[15,122,36,67,100,49],[78,44,12,0,23,75]]
    p1=player("virat",l1,l2)
    pp=pprint.PrettyPrinter()
    pp.pprint(p1)

    The output of above code is −

    {'virat': {'Tests': [140, 45, 39], 'ODI': [15, 122, 36, 67, 100, 49],
    'T20': [78, 44, 12, 0, 23, 75]}}
  • Python – Templating

    Templating in Python

    Templating in Python is a technique used in web development to dynamically generate static HTML pages using templates and data.

    In this tutorial, we will explore the basics of templating in Python, including installation, creating templates, and rendering templates with data, with a focus on the Jinja2 templating engine.

    String Templates in Python

    String templates in Python is a simple way to perform string substitutions. Python’s string module includes the Template class, which provides an easy way to replace placeholders in a string with actual values.

    The Template class in the string module is useful for dynamically forming a string object through a substitution technique described in PEP 292. Its simpler syntax and functionality make it easier to translate for internationalization purposes compared to other built-in string formatting facilities in Python.

    Template strings use the $ symbol for substitution, immediately followed by an identifier that follows the rules of forming a valid Python identifier.

    Creating a Template

    To create a template, you instantiate the Template class with a string that contains placeholders prefixed with $ as shown below −

    from string import Template
    
    template = Template("Hello, $name!")

    Substituting Values

    You can substitute values into the template using the substitute() method, which takes a dictionary of key-value pairs.

    The substitute() method replaces the placeholders (identifiers) in the template with actual values. You can provide these values using keyword arguments or a dictionary. The method then returns a new string with the placeholders filled in.

    Example: Using Keyword Arguments

    Following code substitute identifiers in a template string using keyword arguments −

    from string import Template
    
    tempStr = Template('Hello. My name is $name and my age is $age')
    newStr = tempStr.substitute(name ='Pushpa', age =26)print(newStr)

    It will produce the following output −

    Hello. My name is Pushpa and my age is 26
    

    Example: Using a Dictionary

    In the following example, we use a dictionary object to map the substitution identifiers in the template string −

    from string import Template
    
    tempStr = Template('Hello. My name is $name and my age is $age')
    dct ={'name':'Pushpalata','age':25}
    newStr = tempStr.substitute(dct)print(newStr)

    Following is the output of the above code −

    Hello. My name is Pushpalata and my age is 25
    

    Example: Missing Parameters Raises KeyError

    If the substitute() method is not provided with sufficient parameters to be matched against the identifiers in the template string, Python raises KeyError −

    from string import Template
    
    tempStr = Template('Hello. My name is $name and my age is $age')
    dct ={'name':'Pushpalata'}
    newStr = tempStr.substitute(dct)print(newStr)

    Following is the error produced −

    Traceback (most recent call last):
      File "/home/cg/root/667e441d9ebd5/main.py", line 5, in <module>
    newStr = tempStr.substitute(dct)
      File "/usr/lib/python3.10/string.py", line 121, in substitute
        return self.pattern.sub(convert, self.template)
      File "/usr/lib/python3.10/string.py", line 114, in convert
    return str(mapping[named])
    KeyError: 'age'
    

    Substituting Values Using safe_substitute() Method

    The safe_substitute() method behaves similarly to substitute() method, except for the fact that it doesn’t throw error if the keys are not sufficient or are not matching. Instead, the original placeholder will appear in the resulting string intact.

    Example

    In the following example, we are using the safe_substitue() method for substituting values −

    from string import Template
    tempStr = Template('Hello. My name is $name and my age is $age')
    dct ={'name':'Pushpalata'}
    newStr = tempStr.safe_substitute(dct)print(newStr)

    It will produce the following output −

    Hello. My name is Pushpalata and my age is $age
    

    Installing Jinja2

    To use Jinja2 for templating in Python, you first need to install the library. Jinja2 is a powerful templating engine that is widely used in web development for rendering HTML. It can be installed easily using pip, Python’s package installer −

    pip install jinja2
    

    Creating and Rendering Jinja2 Templates

    Jinja2 is a powerful templating engine for Python that allows you to create dynamic content by blending static template files with data. This section explores how to create Jinja2 templates and render them with data.

    Creating a Jinja2 Template

    To create a Jinja2 template, you define a template string or load it from a file. Templates use double curly braces {{ … }} for placeholders and support control structures like “loops” and “conditionals” with {% … %}.

    Example

    Following is an example of a simple Jinja2 template stored in a file “template.html” −

    <!DOCTYPE html><html><head><title>Hello,{{ name }}!</title></head><body><h1>Hello,{{ name }}!</h1><p>Welcome to our site.</p></body></html>

    Rendering a Jinja2 Template

    To render a Jinja2 template, follow these steps −

    • Loading the Template − Load the template from a file or create it from a string.
    • Creating a Template Object − Use “jinja2.Template” to create a template object.
    • Rendering − Use the render() method on the template object, passing data as arguments or a dictionary.

    Example

    In here, we are rendering Jinja2 template −

    from jinja2 import Template, FileSystemLoader, Environment
    
    # Loading a template from a file (template.html)
    file_loader = FileSystemLoader('.')
    env = Environment(loader=file_loader)
    template = env.get_template('template.html')# Rendering the template with data
    output = template.render(name='Alice')# Output the rendered templateprint(output)

    The output of the rendered Jinja2 template would be an HTML document with the placeholders replaced by the actual data passed during rendering −

    <!DOCTYPE html>
    <html>
    <head>
        <title>Hello, Alice!</title>
    </head>
    <body>
        <h1>Hello, Alice!</h1>
        <p>Welcome to our site.</p>
    </body>
    </html>
    

    Advanced Jinja2 Features

    Jinja2 supports various advanced features such as loops, conditionals, and custom filters, making it a powerful tool for creating complex templates.

    Template Inheritance

    Jinja2 supports template inheritance, allowing you to create a base template with common elements (like headers, footers, navigation bars) and extend or override specific blocks in child templates. This promotes code reuse and maintainability in large projects.

    Example

    This HTML template file named “base.html” defines a basic structure for a web page using Jinja2 templating syntax.

    It includes blocks “{% block title %}” and “{% block content %}” that can be overridden in derived templates to customize the title and main content of the page, respectively −

    <!-- base.html --><!DOCTYPE html><html lang="en"><head><meta charset="UTF-8"><title>{% block title %}Default Title{% endblock %}</title></head><body>{% block content %}{% endblock %}</body></html>

    The following Jinja2 template file “child.html” extends the “base.html” template, overriding the title block to set it to “Child Page” and the content block to include an <h1> header with the text “Child Page Content”.

    <!-- child.html -->{% extends "base.html"%}{% block title %}Child Page{% endblock %}{% block content %}<h1>Child Page Content</h1>{% endblock %}

    Loops

    Jinja2 allows you to iterate over lists or other iterable objects using {% for %} loops. Following is an example of how you can use a loop to generate an unordered list (<ul>) in HTML −

    <ul>{%for item in items %}<li>{{ item }}</li>{% endfor %}</ul>

    Conditionals

    Conditional statements in Jinja2 ({% if %} and {% else %}) is used to control the flow of your templates based on conditions. Here is an example where “Jinja2” checks if user exists and displays a personalized greeting if true; otherwise, it prompts to log in −

    {%if user %}<p>Welcome,{{ user }}!</p>{%else%}<p>Please log in.</p>{% endif %}

    Custom Filters

    Custom filters in Jinja2 is used to define your own filters to manipulate data before displaying it in the template.

    In the following example, a custom filter reverse is defined in Jinja2 to reverse the string “hello”, resulting in “olleh” when applied in the template −

    # Define a custom filter functiondefreverse_string(s):return s[::-1]# Register the filter with the Jinja2 environment
    env.filters['reverse']= reverse_string
    

    In your template, you can then apply the “reverse” filter to any string −

    {{"hello"| reverse }}

    Following is the output obtained −

    olleh
  • Python – Serialization

    Serialization in Python

    Serialization refers to the process of converting an object into a format that can be easily stored, transmitted, or reconstructed later. In Python, this involves converting complex data structures, such as objects or dictionaries, into a byte stream.

    Why Do We Use Serialization?

    Serialization allows data to be easily saved to disk or transmitted over a network, and later reconstructed back into its original form. It is important for tasks like saving game states, storing user preferences, or exchanging data between different systems.

    Serialization Libraries in Python

    Python offers several libraries for serialization, each with its own advantages. Here is a detailed overview of some commonly used serialization libraries in Python −

    • Pickle − This is Python’s built-in module for serializing and deserializing Python objects. It is simple to use but specific to Python and may have security implications if used with untrusted data.
    • JSON − JSON (JavaScript Object Notation) is a lightweight data interchange format that is human-readable and easy to parse. It is ideal for web APIs and cross-platform communication.
    • YAML − YAML: YAML (YAML Ain’t Markup Language) is a human-readable data serialization standard that is also easy for both humans and machines to read and write. It supports complex data structures and is often used in configuration files.

    Serialization Using Pickle Module

    The pickle module in Python is used for serializing and deserializing objects. Serialization, also known as pickling, involves converting a Python object into a byte stream, which can then be stored in a file or transmitted over a network.

    Deserialization, or unpickling, is the reverse process, converting the byte stream back into a Python object.

    Serializing an Object

    We can serialize an object using the dump() function and write it to a file. The file must be opened in binary write mode (‘wb’).

    Example

    In the following example, a dictionary is serialized and written to a file named “data.pkl” −

    import pickle
    
    data ={'name':'Alice','age':30,'city':'New York'}# Open a file in binary write modewithopen('data.pkl','wb')asfile:# Serialize the data and write it to the file
       pickle.dump(data,file)print("File created!!")

    When above code is executed, the dictionary object’s byte representation will be stored in data.pkl file.

    Deserializing an Object

    To deserialize or unpickle the object, you can use the load() function. The file must be opened in binary read mode (‘rb’) as shown below −

    import pickle
    
    # Open the file in binary read modewithopen('data.pkl','rb')asfile:# Deserialize the data
       data = pickle.load(file)print(data)

    This will read the byte stream from “data.pkl” and convert it back into the original dictionary as shown below −

    {'name': 'Alice', 'age': 30, 'city': 'New York'}
    

    Pickle Protocols

    Protocols are the conventions used in constructing and deconstructing Python objects to/from binary data.

    The pickle module supports different serialization protocols, with higher protocols generally offering more features and better performance. Currently pickle module defines 6 different protocols as listed below −

    Sr.No.Protocol & Description
    1Protocol version 0Original “human-readable” protocol backwards compatible with earlier versions.
    2Protocol version 1Old binary format also compatible with earlier versions of Python.
    3Protocol version 2Introduced in Python 2.3 provides efficient pickling of new-style classes.
    4Protocol version 3Added in Python 3.0. recommended when compatibility with other Python 3 versions is required.
    5Protocol version 4Introduced in Python 3.4. It adds support for very large objects.
    6Protocol version 5Introduced in Python 3.8. It adds support for out-of-band data.

    You can specify the protocol by passing it as an argument to pickle.dump() function.

    To know the highest and default protocol version of your Python installation, use the following constants defined in the pickle module −

    >>>import pickle
    >>> pickle.HIGHEST_PROTOCOL
    5>>> pickle.DEFAULT_PROTOCOL
    4

    Pickler and Unpickler Classes

    The pickle module in Python also defines Pickler and Unpickler classes for more detailed control over the serialization and deserialization processes. The “Pickler” class writes pickle data to a file, while the “Unpickler” class reads binary data from a file and reconstructs the original Python object.

    Using the Pickler Class

    To serialize a Python object using the Pickler class, you can follow these steps −

    from pickle import Pickler
    
    # Open a file in binary write modewithopen("data.txt","wb")as f:# Create a dictionary
       dct ={'name':'Ravi','age':23,'Gender':'M','marks':75}# Create a Pickler object and write the dictionary to the file
       Pickler(f).dump(dct)print("Success!!")

    After executing the above code, the dictionary object’s byte representation will be stored in “data.txt” file.

    Using the Unpickler Class

    To deserialize the data from a binary file using the Unpickler class, you can do the following −

    from pickle import Unpickler
    
    # Open the file in binary read modewithopen("data.txt","rb")as f:# Create an Unpickler object and load the dictionary from the file
       dct = Unpickler(f).load()# Print the dictionaryprint(dct)

    We get the output as follows −

    {'name': 'Ravi', 'age': 23, 'Gender': 'M', 'marks': 75}
    

    Pickling Custom Class Objects

    The pickle module can also serialize and deserialize custom classes. The class definition must be available at both the time of pickling and unpickling.

    Example

    In this example, an instance of the “Person” class is serialized and then deserialized, maintaining the state of the object −

    import pickle
    classPerson:def__init__(self, name, age, city):
          self.name = name
          self.age = age
          self.city = city
    
    # Create an instance of the Person class
    person = Person('Alice',30,'New York')# Serialize the person objectwithopen('person.pkl','wb')asfile:
       pickle.dump(person,file)# Deserialize the person objectwithopen('person.pkl','rb')asfile:
       person = pickle.load(file)print(person.name, person.age, person.city)

    After executing the above code, we get the following output −

    Alice 30 New York
    

    The Python standard library also includes the marshal module, which is used for internal serialization of Python objects. Unlike pickle, which is designed for general-purpose use, marshal is primarily intended for use by Python itself (e.g., for writing .pyc files).

    It is generally not recommended for general-purpose serialization due to potential compatibility issues between Python versions.

    Using JSON for Serialization

    JSON (JavaScript Object Notation) is a popular format for data interchange. It is human-readable, easy to write, and language-independent, making it ideal for serialization.

    Python provides built-in support for JSON through the json module, which allows you to serialize and deserialize data to and from JSON format.

    Serialization

    Serialization is the process of converting a Python object into a JSON string or writing it to a file.

    Example: Serialize Data to a JSON String

    In the example below, we use the json.dumps() function to convert a Python dictionary to a JSON string −

    import json
    
    # Create a dictionary
    data ={"name":"Alice","age":25,"city":"San Francisco"}# Serialize the dictionary to a JSON string
    json_string = json.dumps(data)print(json_string)

    Following is the output of the above code −

    {"name": "Alice", "age": 25, "city": "San Francisco"}
    

    Example: Serialize Data and Write to a File

    In here, we use the json.dump() function to write the serialized JSON data directly to a file −

    import json
    
    # Create a dictionary
    data ={"name":"Alice","age":25,"city":"San Francisco"}# Serialize the dictionary and write it to a filewithopen("data.json","w")as f:
       json.dump(data, f)print("Success!!")

    Deserialization

    Deserialization is the process of converting a JSON string back into a Python object or reading it from a file.

    Example: Deserialize a JSON String

    In the following example, we use the json.loads() function to convert a JSON string back into a Python dictionary −

    import json
    
    # JSON string
    json_string ='{"name": "Alice", "age": 25, "city": "San Francisco"}'# Deserialize the JSON string into a Python dictionary
    loaded_data = json.loads(json_string)print(loaded_data)

    It will produce the following output −

    {'name': 'Alice', 'age': 25, 'city': 'San Francisco'}
    

    Example: Deserialize Data from a File

    Here, we use the json.load() function to read JSON data from a file and convert it to a Python dictionary−

    import json
    
    # Open the file and load the JSON data into a Python dictionarywithopen("data.json","r")as f:
       loaded_data = json.load(f)print(loaded_data)

    The output obtained is as follows −

    {'name': 'Alice', 'age': 25, 'city': 'San Francisco'}
    

    Using YAML for Serialization

    YAML (YAML Ain’t Markup Language) is a human-readable data serialization standard that is commonly used for configuration files and data interchange.

    Python supports YAML serialization and deserialization through the pyyaml package, which needs to be installed first as shown below −

    pip install pyyaml
    

    Example: Serialize Data and Write to a YAML File

    In the below example, yaml.dump() function converts the Python dictionary data into a YAML string and writes it to the file “data.yaml”.

    The “default_flow_style” parameter ensures that the YAML output is more human-readable with expanded formatting −

    import yaml
    
    # Create a Python dictionary
    data ={"name":"Emily","age":35,"city":"Seattle"}# Serialize the dictionary and write it to a YAML filewithopen("data.yaml","w")as f:
       yaml.dump(data, f, default_flow_style=False)print("Success!!")

    Example: Deserialize Data from a YAML File

    Here, yaml.safe_load() function is used to safely load the YAML data from “data.yaml” and convert it into a Python dictionary (loaded_data) −

    Using safe_load() is preferred for security reasons as it only allows basic Python data types and avoids executing arbitrary code from YAML files.

    import yaml
    
    # Deserialize data from a YAML filewithopen("data.yaml","r")as f:
       loaded_data = yaml.safe_load(f)print(loaded_data)

    The output produced is as shown below −

    {'age': 35, 'city': 'Seattle', 'name': 'Emily'}
  • Python – Weak References

    Python uses reference counting mechanism while implementing garbage collection policy. Whenever an object in the memory is referred, the count is incremented by one. On the other hand, when the reference is removed, the count is decremented by 1. If the garbage collector running in the background finds any object with count as 0, it is removed and the memory occupied is reclaimed.

    Weak reference is a reference that does not protect the object from getting garbage collected. It proves important when you need to implement caches for large objects, as well as in a situation where reduction of Pain from circular references is desired.

    To create weak references, Python has provided us with a module named weakref.

    The ref class in this module manages the weak reference to an object. When called, it retrieves the original object.

    To create a weak reference −

    weakref.ref(class())

    Example

    import weakref
    classMyclass:def__del__(self):print('(Deleting {})'.format(self))
    obj = Myclass()
    r = weakref.ref(obj)print('object:', obj)print('reference:', r)print('call r():', r())print('deleting obj')del obj
    print('r():', r())

    Calling the reference object after deleting the referent returns None.

    It will produce the following output −

    object: <__main__.Myclass object at 0x00000209D7173290>
    reference: <weakref at 0x00000209D7175940; to 'Myclass' at
    0x00000209D7173290>
    call r(): <__main__.Myclass object at 0x00000209D7173290>
    deleting obj
    (Deleting <__main__.Myclass object at 0x00000209D7173290>)
    r(): None
    

    The callback Function

    The constructor of ref class has an optional parameter called callback function, which gets called when the referred object is deleted.

    import weakref
    classMyclass:def__del__(self):print('(Deleting {})'.format(self))defmycallback(rfr):"""called when referenced object is deleted"""print('calling ({})'.format(rfr))
    obj = Myclass()
    r = weakref.ref(obj, mycallback)print('object:', obj)print('reference:', r)print('call r():', r())print('deleting obj')del obj
    print('r():', r())

    It will produce the following output −

    object: <__main__.Myclass object at 0x000002A0499D3590>
    reference: <weakref at 0x000002A0499D59E0; to 'Myclass' at
    0x000002A0499D3590>
    call r(): <__main__.Myclass object at 0x000002A0499D3590>
    deleting obj
    (Deleting <__main__.Myclass object at 0x000002A0499D3590>)
    calling (<weakref at 0x000002A0499D59E0; dead>)
    r(): None
    

    Finalizing Objects

    The weakref module provides finalize class. Its object is called when the garbage collector collects the object. The object survives until the reference object is called.

    import weakref
    classMyclass:def__del__(self):print('(Deleting {})'.format(self))deffinalizer(*args):print('Finalizer{!r})'.format(args))
    
    obj = Myclass()
    r = weakref.finalize(obj, finalizer,"Call to finalizer")print('object:', obj)print('reference:', r)print('call r():', r())print('deleting obj')del obj
    print('r():', r())

    It will produce the following output −

    object: <__main__.Myclass object at 0x0000021015103590>
    reference: <finalize object at 0x21014eabe80; for 'Myclass' at
    0x21015103590>
    Finalizer('Call to finalizer',))
    call r(): None
    deleting obj
    (Deleting <__main__.Myclass object at 0x0000021015103590>)
    r(): None
    

    The weakref module provides WeakKeyDictionary and WeakValueDictionary classes. They don’t keep the objects alive as they appear in the mapping objects. They are more appropriate for creating a cache of several objects.

    WeakKeyDictionary

    Mapping class that references keys weakly. Entries in the dictionary will be discarded when there is no longer a strong reference to the key.

    An instance of WeakKeyDictionary class is created with an existing dictionary or without any argumentThe functionality is the same as a normal dictionary to add and remove mapping entries to it.

    In the code given below three Person instances are created. It then creates an instance of WeakKeyDictionary with a dictionary where the key is the Person instance and the value is the Person’s name.

    We call the keyrefs() method to retrieve weak references. When the reference to Peron1 is deleted, dictionary keys are printed again. A new Person instance is added to a dictionary with weakly referenced keys. At last, we are printing keys of dictionary again.

    Example

    import weakref
    
    classPerson:def__init__(self, person_id, name, age):
          self.emp_id = person_id
          self.name = name
          self.age = age
    
       def__repr__(self):return"{} : {} : {}".format(self.person_id, self.name, self.age)
    Person1 = Person(101,"Jeevan",30)
    Person2 = Person(102,"Ramanna",35)
    Person3 = Person(103,"Simran",28)
    weak_dict = weakref.WeakKeyDictionary({Person1: Person1.name, Person2: Person2.name, Person3: Person3.name})print("Weak Key Dictionary : {}\n".format(weak_dict.data))print("Dictionary Keys : {}\n".format([key().name for key in weak_dict.keyrefs()]))del Person1
    print("Dictionary Keys : {}\n".format([key().name for key in weak_dict.keyrefs()]))
    Person4 = Person(104,"Partho",32)
    weak_dict.update({Person4: Person4.name})print("Dictionary Keys : {}\n".format([key().name for key in weak_dict.keyrefs()]))

    It will produce the following output −

    Weak Key Dictionary : {<weakref at 0x7f542b6d4180; to 'Person' at 0x7f542b8bbfd0>: 'Jeevan', <weakref at 0x7f542b6d5530; to 'Person' at 0x7f542b8bbeb0>: 'Ramanna', <weakref at 0x7f542b6d55d0; to 'Person' at 0x7f542b8bb7c0>: 'Simran'}
    
    Dictionary Keys : ['Jeevan', 'Ramanna', 'Simran']
    
    Dictionary Keys : ['Ramanna', 'Simran']
    
    Dictionary Keys : ['Ramanna', 'Simran', 'Partho']
    

    WeakValueDictionary

    Mapping class that references values weakly. Entries in the dictionary will be discarded when no strong reference to the value exists any more.

    We shall demonstrate how to create a dictionary with weakly referenced values using WeakValueDictionary.

    The code is similar to previous example but this time we are using Person name as key and Person instance as values. We are using valuerefs() method to retrieve weakly referenced values of the dictionary.

    Example

    import weakref
    
    classPerson:def__init__(self, person_id, name, age):
          self.emp_id = person_id
          self.name = name
          self.age = age
       
       def__repr__(self):return"{} : {} : {}".format(self.person_id, self.name, self.age)
    
    Person1 = Person(101,"Jeevan",30)
    Person2 = Person(102,"Ramanna",35)
    Person3 = Person(103,"Simran",28)
    
    weak_dict = weakref.WeakValueDictionary({Person1.name:Person1, Person2.name:Person2, Person3.name:Person3})print("Weak Value Dictionary : {}\n".format(weak_dict.data))print("Dictionary Values : {}\n".format([value().name for value in weak_dict.valuerefs()]))del Person1
    print("Dictionary Values : {}\n".format([value().name for value in weak_dict.valuerefs()]))
    Person4 = Person(104,"Partho",32)
    weak_dict.update({Person4.name: Person4})print("Dictionary Values : {}\n".format([value().name for value in weak_dict.valuerefs()]))

    It will produce the following output −

    Weak Value Dictionary : {'Jeevan': <weakref at 0x7f3af9fe4180; to 'Person' at 0x7f3afa1c7fd0>, 'Ramanna': <weakref at 0x7f3af9fe5530; to 'Person' at 0x7f3afa1c7eb0>, 'Simran': <weakref at 0x7f3af9fe55d0; to 'Person' at 0x7f3afa1c77c0>}
    
    Dictionary Values : ['Jeevan', 'Ramanna', 'Simran']
    
    Dictionary Values : ['Ramanna', 'Simran']
    
    Dictionary Values : ['Ramanna', 'Simran', 'Partho']